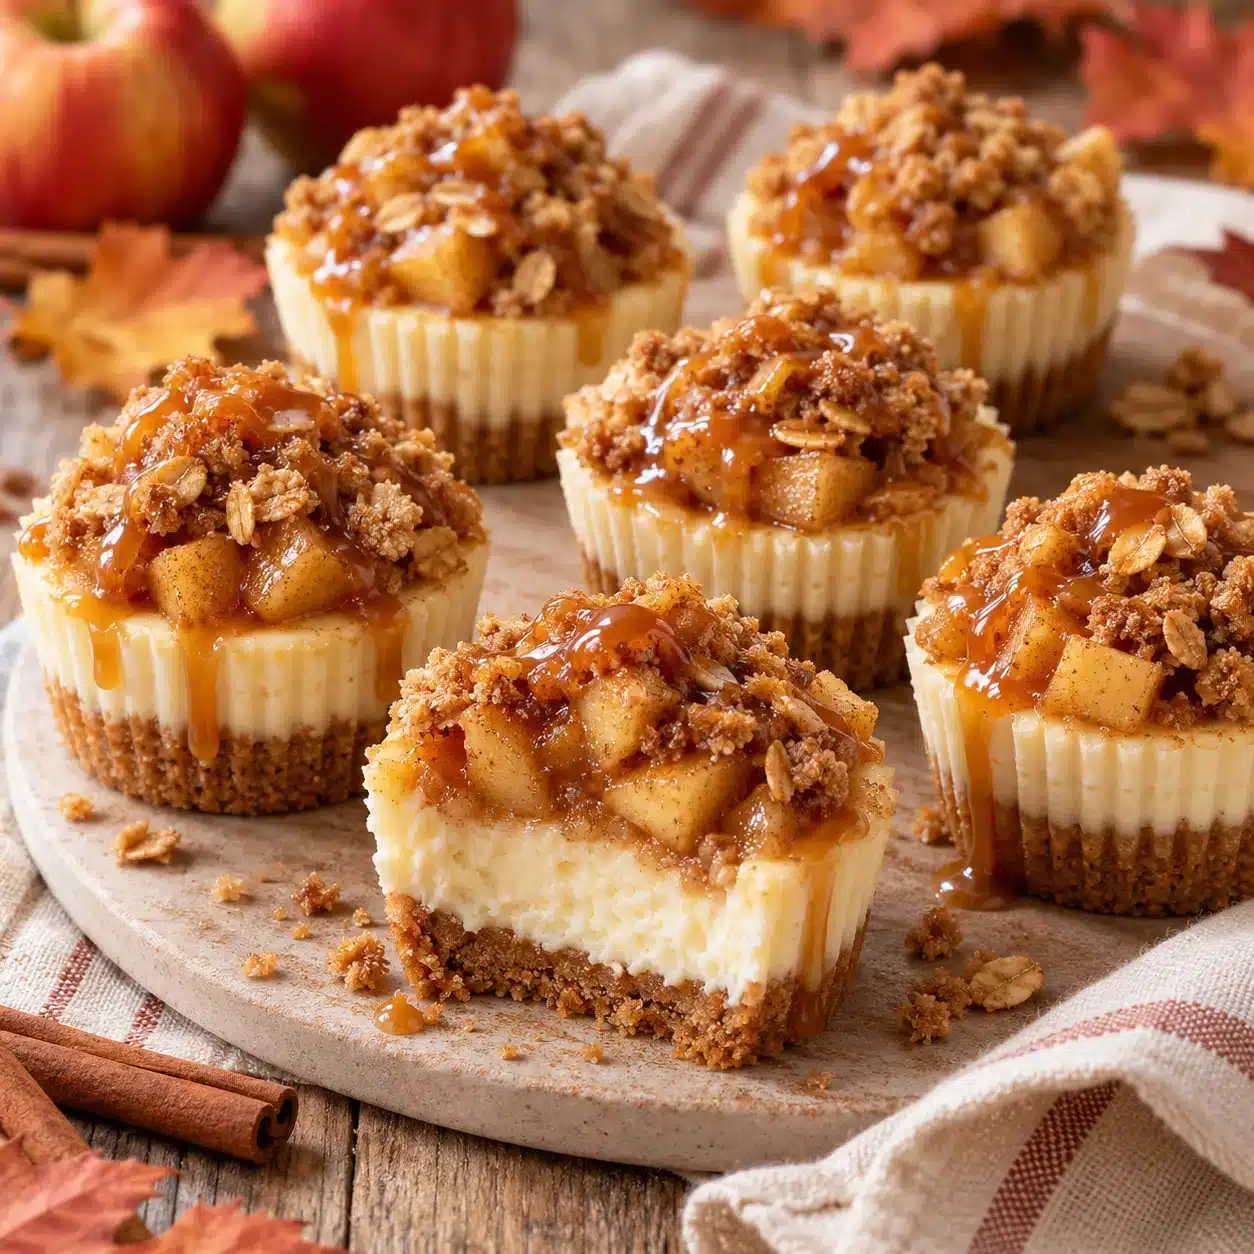
Apple Crisp Mini Cheesecakes bring together four favorite dessert textures in one perfectly portioned treat: a buttery graham cracker crust, smooth vanilla cheesecake, cinnamon-spiced apples, and a golden oat streusel. Add a light caramel drizzle just before serving and every bite tastes like apple crisp and classic cheesecake met at a cozy fall gathering.
These individual cheesecakes look impressive, but each component uses familiar supermarket ingredients and straightforward techniques. A standard muffin pan creates neat single servings, so there is no springform pan, water bath, or stressful slicing. They are ideal for Thanksgiving, autumn parties, bake sales, game nights, or any afternoon when you want an easy homemade snack that feels a little special.
Table of Contents
Why You’ll Love Apple Crisp Mini Cheesecakes
This recipe delivers the flavor of a full-size cheesecake with far less fuss. Each paper liner becomes a built-in serving wrapper, and the individual cakes bake more quickly and cool more evenly than a large cheesecake. They are one of those Super Easy Fall Desserts that can still earn a centerpiece spot on the dessert table.
- Four textures in every bite: Crisp crust, creamy filling, soft apples, and crunchy streusel keep the dessert interesting from top to bottom.
- No water bath: Small cheesecakes bake gently without the elaborate setup required for many full-size recipes.
- Easy to portion: Everyone receives a complete dessert, and there is no need to cut clean slices during a party.
- Make-ahead friendly: The cheesecakes need time to chill, which means you can finish them before guests arrive.
- Perfect fall flavor: Apple, cinnamon, brown sugar, oats, nutmeg, and caramel create the warm profile people expect from autumn baking.
- Kid-friendly project: Children can help press the crumbs into the liners, toss the apples, and sprinkle the streusel.
- Freezer friendly: Undecorated mini cheesecakes freeze well, allowing you to keep a few individual treats ready for later.
If you collect Bake Off Dessert Ideas, this is an excellent choice because the distinct layers show skill without requiring advanced decorating. The combination also appeals to a wide range of guests: cheesecake fans get a tangy, creamy center, while apple crisp lovers get fruit, spice, and buttery crumbs.
The Four Delicious Layers
1. Cinnamon Graham Cracker Crust
Graham cracker crumbs, melted butter, sugar, and cinnamon form a sturdy base. Pressing the mixture firmly helps the crust hold together after chilling. A small flat-bottomed measuring cup makes this job quick and produces an even layer in every liner.
2. Vanilla Cheesecake Filling
Full-fat brick-style cream cheese creates the smoothest filling. Sugar softens the tang, vanilla adds warmth, sour cream keeps the texture velvety, and a small amount of flour gives the individual cakes enough structure. Eggs bind everything together, but they should be mixed gently to avoid excess air.
3. Cinnamon Apple Filling
Finely diced apples soften during baking while retaining little bites of fruit. Brown sugar, cinnamon, nutmeg, and lemon highlight their flavor. Cornstarch captures the juices so the apple layer stays glossy instead of making the cheesecake watery.
4. Oat Streusel
The streusel gives these mini cheesecakes their apple-crisp character. Flour, oats, brown sugar, spice, and melted butter form coarse crumbs that become golden in the oven. Chill the mixture while preparing the filling so the crumbs remain distinct rather than melting into one solid layer.
Ingredients You’ll Need
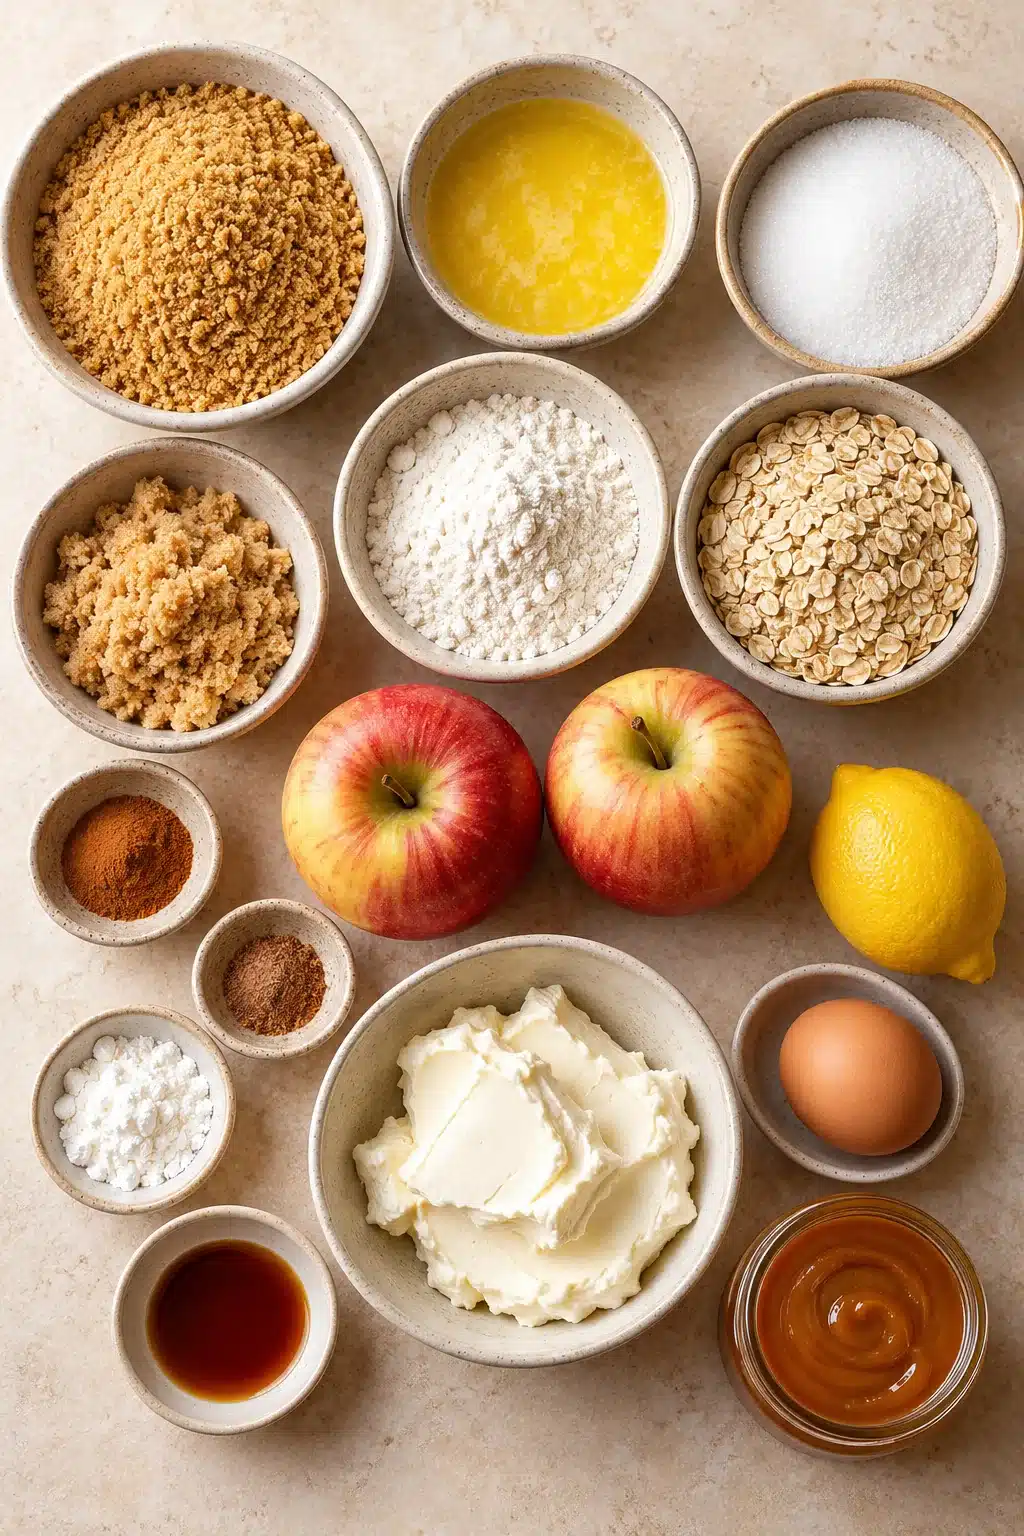
The printable card below includes exact measurements. For the best results, bring the refrigerated cheesecake ingredients to room temperature before mixing, but keep the prepared streusel cold until assembly.
Graham Cracker Crumbs
Use finely crushed graham crackers so the crust packs tightly. You can buy ready-made crumbs or pulse whole crackers in a food processor. If crushing by hand, seal the crackers in a sturdy bag and roll over them until no large pieces remain.
Butter
Unsalted butter binds both the crust and streusel while allowing you to control the salt. Melt it, then let it cool for a few minutes. Butter that is extremely hot can dissolve the sugar and make the streusel greasy rather than crumbly.
Cream Cheese
Choose full-fat cream cheese sold in firm bricks. Tub-style spread often contains extra moisture and may produce a filling that does not set as neatly. Room-temperature cream cheese blends smoothly without requiring aggressive beating, which reduces the chance of cracks.
Sour Cream
A little full-fat sour cream softens the density of the cream cheese and gives the filling a polished texture. Plain Greek yogurt can work in a pinch, although the final flavor will be slightly tangier.
Apples
Use firm baking apples and dice them into pieces no larger than one-quarter inch. Small pieces cook in the same time as the cheesecake and sit neatly on the individual portions. Peel the fruit for the most tender, consistent texture.
Oats
Quick-cooking oats produce a delicate topping that suits the small cheesecakes. Old-fashioned oats may also be used, but briefly pulse them to reduce their size. Avoid instant flavored oatmeal because it contains additional sugar and seasonings.
Cinnamon, Nutmeg, and Vanilla
These familiar aromatics connect the apple, crust, and cheesecake layers. Cinnamon appears in several components, but measured amounts prevent it from overwhelming the vanilla filling. Nutmeg is stronger, so a small pinch is enough.
The Best Apples for Mini Cheesecakes
The best apple holds its shape under heat and offers enough acidity to balance the sweet crust and creamy filling. Granny Smith is dependable and pleasantly tart. Honeycrisp remains crisp and has a fragrant sweetness, while Pink Lady brings a bright sweet-tart flavor. Golden Delicious softens beautifully and tastes mellow and honeyed.
Using two varieties creates extra depth. Pair a tart Granny Smith with a sweeter Honeycrisp or Golden Delicious. Avoid apples that are already soft or mealy, because they can release excessive juice and lose their shape. Whatever you choose, dice the pieces evenly so they bake at the same rate.
How to Make Apple Crisp Mini Cheesecakes
Step 1: Prepare the Pan and Oven
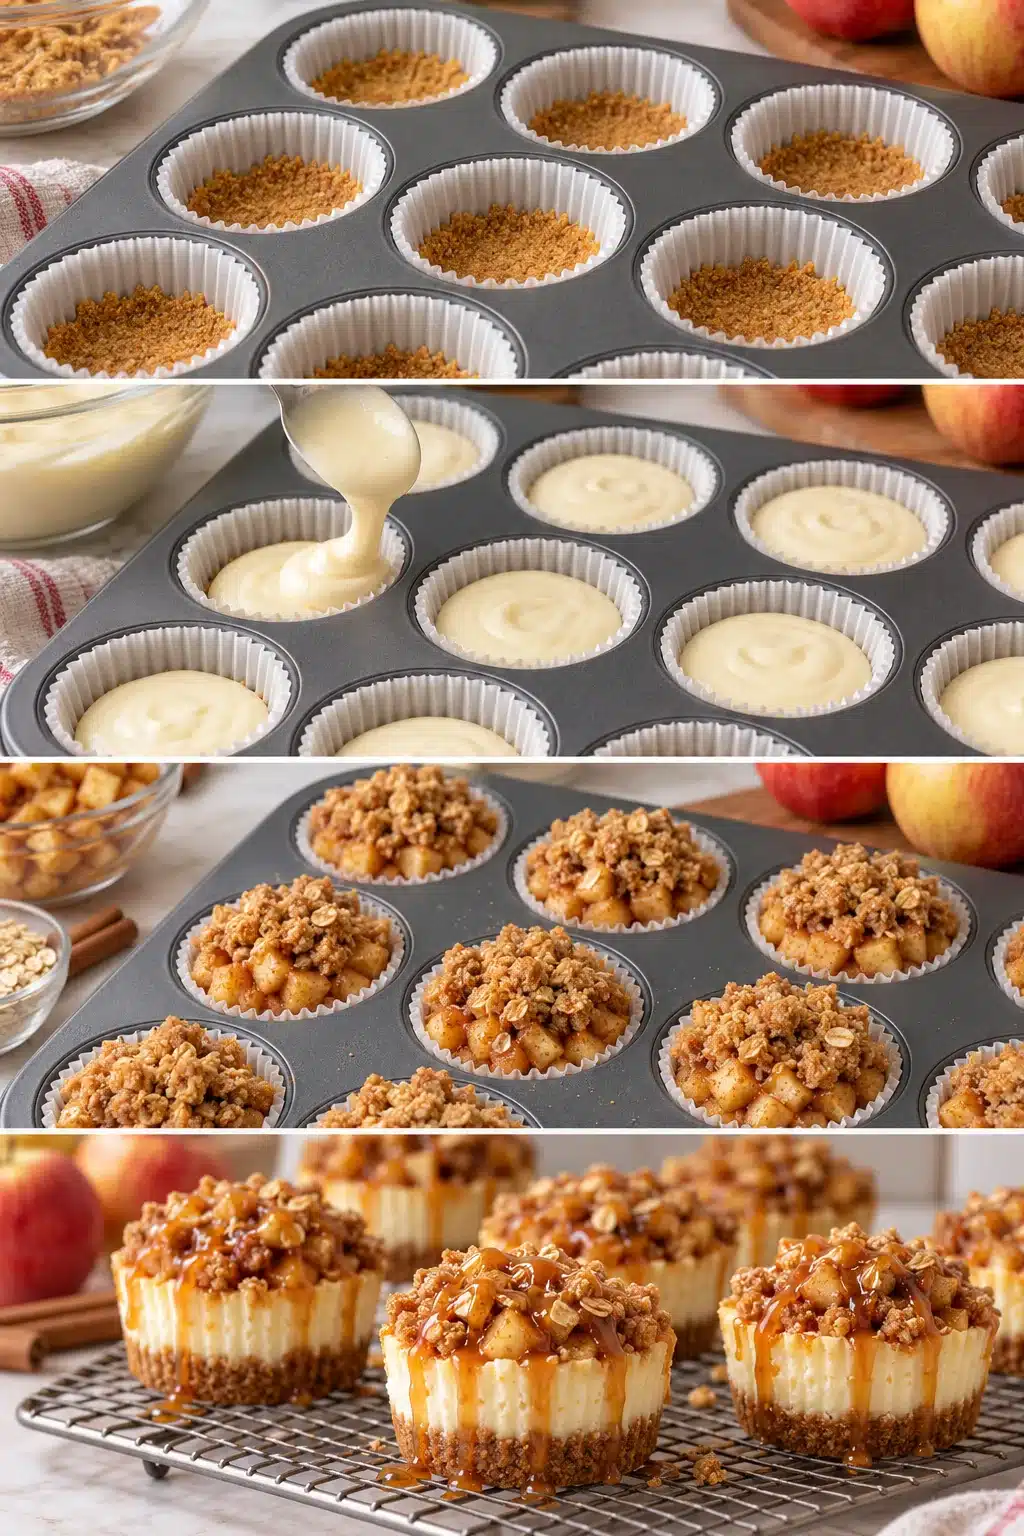
Preheat the oven to 325°F and place a rack in the center. Line all 12 cups of a standard muffin pan with paper liners. Paper liners make removal easy and protect the delicate crust. Light-colored metal pans tend to bake more evenly than very dark pans, which can brown the crust quickly.
Step 2: Make the Crust
Mix the graham crumbs, sugar, and cinnamon, then stir in melted butter until the texture resembles damp sand. Divide the mixture among the liners, using about one heaping tablespoon per cup. Press firmly into a flat layer. Bake for 5 minutes, then cool while preparing the remaining components.
Step 3: Mix the Streusel
Combine flour, oats, brown sugar, cinnamon, nutmeg, and a pinch of salt. Pour in the cooled melted butter and stir with a fork until irregular crumbs form. Some pieces should be sandy and others pea-sized. Refrigerate the bowl so the butter firms while you prepare the cheesecake batter.
Step 4: Prepare the Cheesecake Batter
Beat the softened cream cheese on low speed until smooth. Add sugar and flour, mixing only until combined. Blend in the sour cream and vanilla. Add the eggs one at a time on the lowest speed, stopping as soon as the yellow streaks disappear. Scrape the bowl with a flexible spatula to ensure no dense cream cheese remains at the bottom.
Overmixing eggs incorporates air. Those bubbles expand in the oven and collapse during cooling, which can create cracks or sunken centers. A smooth batter matters, but gentle mixing matters more once the eggs are present.
Step 5: Season the Apples
Peel, core, and finely dice the apples shortly before assembly. Toss them with lemon juice, brown sugar, cinnamon, nutmeg, and cornstarch. The lemon limits browning and sharpens the flavor, while the cornstarch thickens the juice released during baking.
Step 6: Assemble the Layers
Divide the cheesecake batter evenly over the cooled crusts, filling each cup about two-thirds full. Spoon the apple mixture across the tops and gently press it into the batter. Finish with a generous layer of cold oat streusel. Do not pack the crumbs down; loose clusters become crisper.
Step 7: Bake
Bake for 24 to 28 minutes. The edges should look set, the streusel should be lightly golden, and the centers should retain a slight wobble when the pan is nudged. They will continue setting as they cool. Avoid waiting until the centers look completely firm, which can lead to dry cheesecake.
Step 8: Cool and Chill
Cool the cheesecakes in the pan for 30 minutes, then transfer them to a rack. Once they reach room temperature, refrigerate for at least 3 hours. Chilling firms the filling, sets the layers, and makes the paper liners easier to remove cleanly.
Step 9: Decorate and Serve
Drizzle each chilled cheesecake with caramel immediately before serving. Keep the drizzle light enough that the crisp topping remains visible. A small swirl of whipped cream, a pinch of cinnamon, or a thin apple slice can be added for presentation, but the layered cakes are already beautiful on their own.

Apple Crisp Mini Cheesecakes
Ingredients
Equipment
Method
- Preheat the oven to 325°F with a rack in the center. Line a standard 12-cup muffin pan with paper liners.
- Stir the graham crumbs, granulated sugar, and cinnamon together. Add 4 tablespoons melted butter and mix until evenly moistened. Divide among the liners and press firmly into flat layers.
- Bake the crusts for 5 minutes, then place the pan on a rack to cool while preparing the toppings and filling.
- Combine the flour, oats, brown sugar, cinnamon, nutmeg, and salt. Stir in 4 tablespoons melted butter with a fork until coarse crumbs form. Refrigerate until assembly.
- Beat the cream cheese on low speed until smooth. Mix in the sugar and flour, followed by the sour cream and vanilla. Add the eggs one at a time on low speed, mixing only until combined.
- Toss the diced apples with lemon juice, brown sugar, cinnamon, nutmeg, and cornstarch until evenly coated.
- Divide the cheesecake batter evenly over the crusts. Spoon the apples on top and gently press them into the batter. Sprinkle generously with the cold oat streusel.
- Bake for 24 to 28 minutes, until the edges are set, the streusel is lightly golden, and the centers still wobble slightly when the pan is nudged.
- Cool in the pan for 30 minutes, then transfer the cheesecakes to a rack. Once at room temperature, refrigerate for at least 3 hours.
- Drizzle the chilled mini cheesecakes with caramel just before serving. Keep refrigerated until close to serving time.
Notes
- Use full-fat brick-style cream cheese for the smoothest, most stable filling.
- Dice the apples no larger than 1/4 inch so they soften during the short baking time.
- Mix the batter on low after adding eggs to avoid excess air and cracking.
- Do not overbake; the centers should still have a gentle wobble.
- Refrigerate for at least 3 hours before serving and add caramel at the last minute.
- Nutrition is an estimate and varies with the apples and caramel used.
Tips for Perfect Mini Cheesecakes
- Use room-temperature dairy and eggs: Ingredients at a similar temperature combine smoothly and require less mixing.
- Measure flour correctly: Spoon it into the measuring cup and level the top. Scooping directly from the bag can pack in too much.
- Dice apples very small: Large chunks may remain firm and can overwhelm the individual cakes.
- Keep the streusel cold: Chilled crumbs hold their shape and bake into a more defined topping.
- Mix on low speed: Cheesecake batter does not benefit from being whipped. Less incorporated air means flatter, creamier tops.
- Do not overbake: A gentle wobble in the center is desirable. Carryover heat finishes the set.
- Chill completely: Warm cheesecake tastes soft and eggy. Several hours in the refrigerator develop the proper creamy texture.
- Add caramel at serving time: Early drizzling can soften the streusel during storage.
A Stress-Free Make-Ahead Schedule
For a holiday or party, divide the work over two days. The day before serving, prepare and bake the mini cheesecakes, cool them completely, and refrigerate them in a covered container. On serving day, arrange them on a platter and add caramel no more than 30 minutes before dessert.
You can also prepare the crumbs and streusel several hours before baking. Store the crumb mixture covered at room temperature and refrigerate the streusel. Dice the apples only when you are ready to assemble because freshly cut fruit has the best color and texture. This schedule keeps the final hour simple and makes the recipe especially useful as an Apple Dessert For Thanksgiving.
Easy Flavor Variations
The basic structure is flexible. Keep the volume of topping and filling similar, and you can adjust the flavor without changing the baking method.
- Salted caramel: Use salted caramel sauce and finish each cheesecake with a few flakes of sea salt.
- Pecan apple crisp: Add one-third cup finely chopped toasted pecans to the streusel for extra crunch.
- Maple cinnamon: Replace two tablespoons of cheesecake sugar with pure maple syrup and add a little maple extract.
- Gingersnap crust: Substitute finely crushed gingersnap cookies for the graham crackers to create a spicier autumn base.
- Pear crisp: Replace one apple with a firm Bosc pear and keep the pieces small.
- Cranberry apple: Add a few finely chopped dried cranberries to the apples for tart color.
- Apple butter swirl: Swirl a teaspoon of thick apple butter into each cheesecake before adding fruit and streusel.
- Mini-muffin bites: Use a mini muffin pan, reduce every layer, and begin checking after 12 minutes. The yield and timing will vary by pan.
These variations make the recipe useful for a whole season of Fall Flavor Desserts. A gingersnap version feels festive for Halloween, salted caramel suits Thanksgiving, and cranberry apple transitions easily toward winter celebrations.
Serving Ideas for Fall Gatherings
Serve the cheesecakes chilled or let them stand at cool room temperature for 15 minutes to soften slightly. Arrange them on a cake stand or wooden board with small apple wedges, cinnamon sticks, and autumn leaves used only as decoration. Keep caramel in a small pitcher so guests can add more if desired.
For a Thanksgiving dessert buffet, their small size is an advantage because guests can sample several sweets without committing to a large slice. They also travel more easily than a full cheesecake. Place the chilled cakes in a covered container with a non-slip mat underneath, then add caramel after reaching your destination.
Parents looking for Kids Fall Desserts can let children decorate their own chilled cheesecakes with a small spoonful of caramel or a few festive sprinkles. For Fun Fall Desserts Easy enough for a family baking afternoon, assign younger helpers the crust pressing and streusel sprinkling while an adult handles the oven.
They are also excellent Cold Fall Desserts for warm September days when you want autumn flavor without serving something hot. Anyone collecting September Deserts can make the cheesecakes with early-season apples, chill them overnight, and serve them straight from the refrigerator at a picnic or school gathering.
How to Store and Freeze Mini Cheesecakes
Refrigerating
Store completely cooled cheesecakes in a single layer inside an airtight container. Refrigerate for up to 4 days. To protect the streusel, wait to add caramel or whipped cream until shortly before serving. If condensation forms on the lid, blot it carefully without touching the toppings.
Because cheesecake contains dairy and eggs, it should not remain at room temperature indefinitely. The official FoodSafety.gov chilling guidance recommends refrigerating perishable food within 2 hours, or within 1 hour when the temperature is above 90°F.
Freezing
Chill the undecorated cheesecakes until firm, then freeze them on a tray. Once solid, wrap each one in plastic wrap and place them together in a freezer-safe container. Freeze for up to 2 months. Thaw overnight in the refrigerator while still wrapped, then unwrap and add caramel before serving.
The streusel may soften slightly after freezing, but the flavor remains delicious. For the crispest presentation at a major event, refrigerate rather than freeze. For everyday treats and planning ahead, freezing is convenient and lets you remove only the number you need.
Mini Cheesecake Troubleshooting Guide
Why Did the Centers Sink?
A small dip is normal and provides a natural place for apples and caramel. A dramatic collapse usually comes from too much air in the batter or a sudden temperature change. Mix on low, avoid opening the oven early, and cool the cakes gradually in the pan.
Why Is the Crust Crumbly?
The crumbs may not have been fine enough, evenly moistened, or firmly packed. The mixture should resemble damp sand and hold when squeezed. Press with a flat tool and give the crust its short pre-bake before adding filling.
Why Is the Apple Layer Watery?
Very juicy or overripe apples can release more liquid than the cornstarch can manage. Choose firm fruit, measure the lemon juice, and do not let the seasoned apples sit for a long time before assembly. If liquid gathers in the bowl, spoon the fruit onto the cakes rather than pouring in every drop.
Why Is the Filling Lumpy?
Cold cream cheese is the usual cause. Let it soften fully, then beat it smooth before adding other ingredients. Scrape the bowl frequently. Once the eggs are added, do not try to beat out lumps at high speed because that introduces too much air.
More Fall Desserts You’ll Love
- Salted Caramel Apple Crumble Bars – portable bars with cinnamon apples and buttery oat crumble.
- Chocolate Chip Cheesecake Bars – an easy creamy dessert for parties and game nights.
- Simple Apple Crumble – classic baked apple comfort with a golden topping.
- Pumpkin Crunch Cake – a layered fall dessert with cream cheese frosting.
Final Thoughts on Apple Crisp Mini Cheesecakes
Apple Crisp Mini Cheesecakes offer everything people love about fall baking in one tidy portion. The graham crust supports a creamy vanilla center, the apples bring fresh seasonal flavor, and the oat streusel provides the crunch that makes each bite feel complete. Caramel is the finishing touch rather than a requirement, so the dessert is easy to adapt to your preferred level of sweetness.
They look bakery-worthy but rely on approachable steps and familiar equipment. Make them a day ahead for Thanksgiving, prepare them with children on an autumn weekend, or freeze a few for future treats. Once you see how convenient individual cheesecake can be, this recipe is likely to become one of your favorite fall desserts.
Apple Crisp Mini Cheesecakes FAQs
1. Can I make Apple Crisp Mini Cheesecakes ahead of time?
Yes. Bake and chill them up to 2 days before serving. Store them covered in the refrigerator and wait to add caramel, whipped cream, or fresh apple garnishes until shortly before serving so the streusel stays attractive.
2. Do mini cheesecakes need a water bath?
No. Their small size allows them to bake evenly at a moderate temperature without a water bath. Room-temperature ingredients, low-speed mixing, and avoiding overbaking are enough to create a creamy filling.
3. Can I use canned apple pie filling?
Fresh apples give the best texture and let you control the sweetness. If canned filling is your only option, chop the apple pieces very finely and use mostly fruit rather than excess sauce. The result will be sweeter and softer.
4. How do I know when mini cheesecakes are done?
The outer edges should look set and the centers should wobble gently as one unit when the pan moves. They should not look liquid, but they do not need to appear completely firm. Cooling and chilling finish the set.
5. Can I freeze Apple Crisp Mini Cheesecakes?
Yes. Freeze the chilled cheesecakes without caramel or whipped cream for up to 2 months. Wrap them individually, thaw overnight in the refrigerator, and decorate after thawing. The streusel may be slightly softer but will still taste good.
6. Can I use a mini muffin pan?
You can, but the quantities, yield, and baking time change. Use mini liners, cut the apples into very tiny pieces, and begin checking around 12 minutes. Remove them when the edges are set and the centers still have a slight wobble.
7. How long can mini cheesecakes sit at room temperature?
Because they contain cream cheese and eggs, do not leave them unrefrigerated for more than 2 hours, or more than 1 hour in temperatures above 90°F. Keep the platter chilled until close to serving time.