Chocolate candy recipes. Those three words used to make me feel excited and slightly panicked at the same time. Maybe you’ve felt that too. You see a photo of glossy, bite-sized treats and think, “That looks doable.” But somewhere between melting the sugar and dipping the chocolate, things fall apart. I’ve been there, more than once.
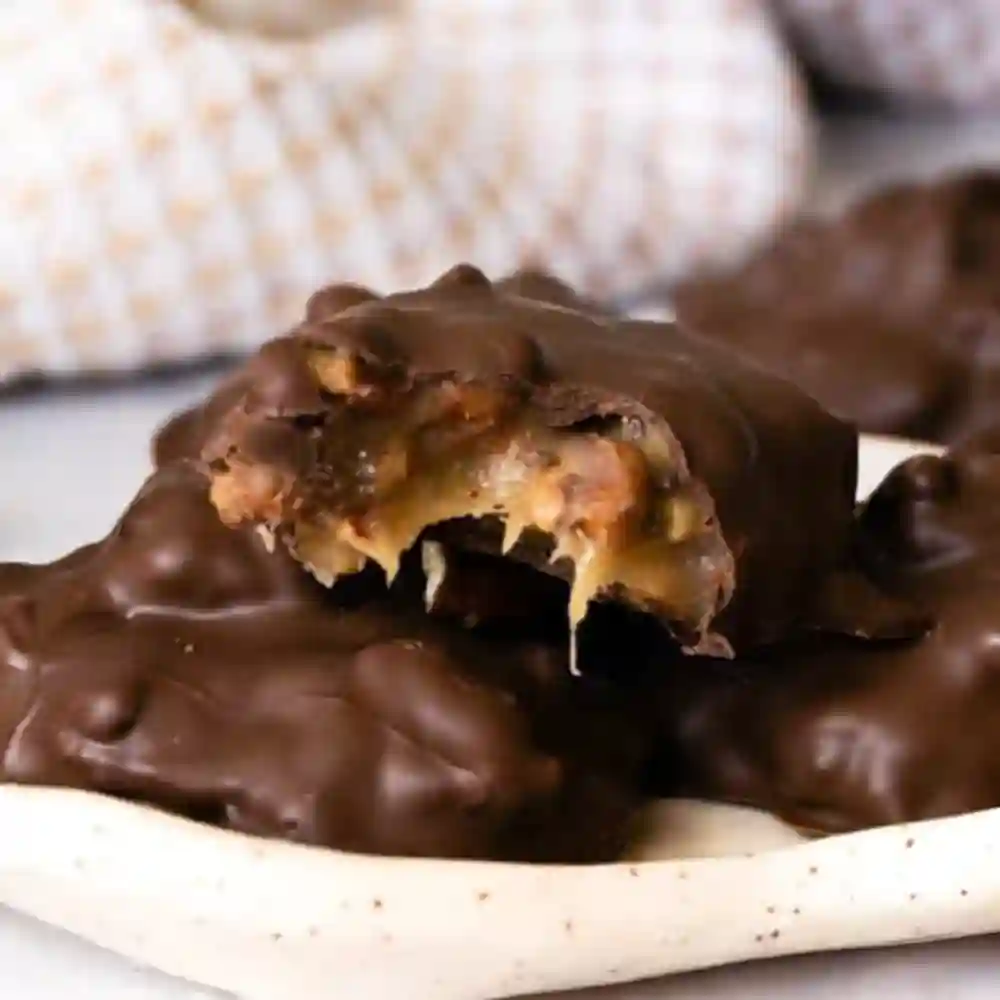
The first time I nailed this recipe, I remember standing in my kitchen and whispering to myself, “Did that actually work?” I dipped a spoon in the caramel, watched it set just right, then tasted one of the pecan clusters. It was sweet, nutty, smooth, and soft where it needed to be. Not just edible, but giftable. That was the moment I knew this wasn’t just another internet recipe.
This guide is for people like us. People who love the idea of homemade sweets but don’t want to spend hours stressing over candy thermometers or dealing with sugar that turns into rock. We’re going to make real chocolate candy, from scratch, without any of the usual drama.
Let’s take it one step at a time. I’ll walk you through it just like I would a friend in my kitchen.
Table of Contents
Table of Contents
Ingredients You’ll Need
When it comes to chocolate candy recipes, the magic often lies in the details. Not in exotic ingredients, but in how each simple element works together. Over the years, I’ve realized that once you understand what each item on the list really does, you start to feel more in control of the process.

Here’s everything you’ll need to make these chocolate turtle clusters that taste like they came from a specialty shop.
- Salted Butter
Adds a rich, smooth base to the caramel. The salt balances the sweetness just enough to keep it from being cloying. - Light Brown Sugar and Granulated Sugar
This combo creates depth. Brown sugar gives that warm molasses tone, while white sugar keeps the caramel texture just right. - Sweetened Condensed Milk
This is what transforms your caramel from sticky and thin to creamy and chewy. It’s a must-have in most successful chocolate candy recipes. - Light Corn Syrup
Prevents the sugar from crystallizing. It’s one of those ingredients that quietly makes everything go smoothly, especially in microwave-based recipes. - Vanilla Extract
Stirred in at the end, it brings a touch of warmth and softness to the flavor. - Pecan Halves
Toasting these beforehand changes everything. It deepens the flavor and gives your candy a buttery crunch that pairs beautifully with the caramel. - Almond Bark or High-Quality Chocolate
Almond bark sets quickly and stays firm at room temperature, which is great for gifting. But if you’re making these for yourself or someone who loves rich chocolate, go for a high-quality brand like Ghirardelli or Bakers.
I’ve learned not to cut corners with these ingredients. Each one plays a role in helping the final candy taste just as good as it looks.
Toasting Pecans for Maximum Flavor
If you’ve ever made chocolate candy recipes and felt like something was missing, there’s a good chance it was the pecans. More specifically, it was the toasting step. I used to skip it. Honestly, it felt like an extra chore when I was already focused on the caramel and chocolate. But once I tried it properly, I never went back.
Fresh pecans are good. Toasted pecans are unforgettable. They bring a deep, nutty aroma and buttery crunch that holds its own even against rich caramel and chocolate. This one small step completely transforms your clusters from “sweet” to “can’t stop eating.”
Oven Toasting: Best for Even Roasting
Preheat your oven to 350°F and spread the pecan halves out on a baking sheet in a single layer. Don’t stack them. Toast for about 5 to 10 minutes, stirring once halfway through. Keep a close eye near the end. When they’re ready, your kitchen will smell warm and nutty, and the edges of the pecans will darken slightly.
Once toasted, let them cool completely before chopping. Warm nuts can carry moisture into the caramel and affect the texture, especially in sensitive chocolate candy recipes.
Skillet Method: Quick and Still Effective
If you’re short on time or oven space, the skillet method works just fine. Heat a dry pan over medium heat, add the pecans, and stir constantly for about 4 to 5 minutes. The key here is to never stop moving them around. Once you smell that deep roasted scent, remove them from heat and cool them on a plate.
Both methods work beautifully. What matters is that you take the time to toast them. You’ll taste the difference in every bite.
Chocolate Candy Recipes
Ingredients
Method
- Toast the Pecans: Bake at 350°F for 5–10 minutes or toast in a skillet until fragrant. Let cool and chop.
- Make Caramel: In a microwave-safe bowl, melt butter. Stir in sugars, condensed milk, and corn syrup. Microwave 6–8 minutes, stirring occasionally. Test with ice water method.
- Add Pecans & Vanilla: Stir in vanilla and chopped pecans until evenly coated.
- Shape Clusters: Drop spoonfuls onto parchment-lined tray. Chill 20 minutes.
- Melt Chocolate: Gently melt chocolate or almond bark.
- Dip & Set: Coat each cluster in chocolate, let excess drip off, and place back on tray to set.
Notes
| Nutrient | Amount |
| Calories | 317 kcal |
| Total Fat | 18 g |
| Saturated Fat | 10 g |
| Carbohydrates | 39 g |
| Sugars | 38 g |
| Protein | 2 g |
Making Foolproof Microwave Caramel
In the world of chocolate candy recipes, caramel is where many people get nervous. It can burn, seize, or end up grainy if the timing is off. I’ve had my fair share of sugar disasters, so trust me when I say this version is different. It’s simple, consistent, and doesn’t require a candy thermometer. That alone is a win.
The secret? Microwave precision and a little trick called the ice water test. Once you’ve done it once, you’ll wonder why you ever bothered with stovetop caramel for small batches.
Step-by-Step Caramel in the Microwave
Start by melting the butter in a large microwave-safe bowl. Once it’s fully melted, stir in the light brown sugar, granulated sugar, sweetened condensed milk, and corn syrup. Mix it well until everything looks smooth.
Now place the bowl back in the microwave and cook on high for about 6 to 8 minutes. I usually stop around 7 minutes, but every microwave is different. The mixture should bubble and thicken as it cooks. It’s important to pause every 2 to 3 minutes just to stir and make sure nothing is sticking to the bottom.
Once it hits that golden, glossy stage, it’s time to test.
Ice Water Test: Your Built-In Candy Thermometer
Scoop a small amount of caramel onto a spoon and drop it into a cup of ice water. Let it sit for a few seconds, then use your fingers to shape it. If it forms a soft ball that holds together, it’s ready. If it dissolves or feels too loose, microwave in 30-second intervals until it firms up properly in the water.
When you’ve hit the sweet spot, take the bowl out carefully and stir in the vanilla extract. It will sizzle a bit, which is normal. Then, fold in your toasted, chopped pecans. This is where the texture starts coming together. The caramel wraps around the nuts, and everything starts to look like candy you’d find in a holiday tin.
Let the mixture cool slightly before shaping into clusters. You’re now past the trickiest part, and everything gets easier from here.
Shaping the Turtle Clusters
This is the part where things start to feel real. You’ve got your warm, glossy caramel wrapped around those toasted pecans, and suddenly the kitchen smells like a candy shop. Now it’s time to turn that golden mix into bite-sized chocolate candy recipes you’ll actually be proud to gift or serve.
There’s no need for molds or fancy tools. Just a spoon, a spatula, and a little parchment paper will do the job perfectly.
Portioning the Perfect Size
Line a baking sheet with parchment paper or a silicone mat. Then, using a tablespoon or small cookie scoop, drop spoonfuls of the caramel-pecan mixture onto the sheet. You can go larger or smaller depending on how indulgent you want them to be, but keeping the clusters uniform helps them set evenly.
Try to flatten each spoonful just a bit with the back of the spoon or spatula. You’re aiming for a mound that’s thick enough to hold shape but not too bulky to bite into.
I’ve found that working quickly is helpful here. As the mixture cools, it stiffens slightly, making it harder to shape. If needed, you can gently rewarm it in the microwave for 10 to 15 seconds.
Chill and Set Before Dipping
Once all your clusters are formed, place the baking sheet in the fridge for about 20 minutes. This helps the caramel firm up and makes them easier to handle when dipping in chocolate.
It might be tempting to skip this chilling step, especially if you’re short on time, but it’s one of those small details that makes your chocolate candy recipes neater and more polished. When the caramel is set, the clusters hold together beautifully and don’t fall apart mid-dip.
At this stage, you’ve got the base of something truly satisfying. Up next comes the chocolate coating, which takes them from “homemade” to “how did you make these?”
Dipping in Chocolate Like a Pro
This is the moment everything comes together. Dipping your clusters in melted chocolate is where your chocolate candy recipes go from homemade charm to polished treats that look ready for a ribbon and a gift box. I used to rush through this part, but once I slowed down and got a feel for the process, it became one of my favorite steps.
The chocolate coating isn’t just for looks. It locks in the caramel’s chewiness, balances the sweetness, and adds that satisfying snap when you bite in.
Melting Chocolate the Right Way
You have two easy options here. First, the microwave. Chop your almond bark or chocolate into chunks and microwave in a heat-safe bowl, pausing every 20 to 30 seconds to stir. Stop when it’s smooth and glossy. If it starts to thicken or feel stiff, you’ve gone too far.
The second option is a double boiler, which is a little slower but more forgiving. Place your chocolate in a heatproof bowl over a pot of simmering water, making sure the bottom of the bowl doesn’t touch the water. Stir gently until melted.
If you’re using almond bark, you’ll find it’s easier to work with. It sets up faster and is more stable at room temperature. For richer flavor, high-quality chocolate is unbeatable, but be ready to chill your clusters after dipping to help it firm up.
Dipping Technique for a Clean Finish
Take one caramel-pecan cluster and gently drop it into the melted chocolate. Use a fork to lift it out, letting the excess drip off through the tines. Don’t rush this. A quick tap on the edge of the bowl helps smooth the surface.
Place each dipped cluster back on parchment paper. Let them sit at room temperature if you’re using almond bark, or refrigerate if using real chocolate. You’ll know they’re ready when the chocolate no longer smudges to the touch.
Watching these set is oddly satisfying. They go from glossy and sticky to perfectly firm, almost like you’ve done this a hundred times.
Storage Tips That Actually Work
After all the effort and care that goes into homemade candy, storage can make or break the final result. Whether you’re making these for gifting or to enjoy slowly over the next few weeks, knowing how to store them properly helps preserve everything you love about them the soft caramel, the crisp chocolate shell, and the toasted nutty crunch.
I’ve tested just about every storage method through holidays, hot kitchens, and crowded fridges. Some worked perfectly. Others… ended in sticky regret. Here’s what consistently keeps these treats at their best.
Room Temperature or Fridge?
If you used almond bark, you’re in luck. These candies can be stored in an airtight container at room temperature for up to two weeks. Just make sure they’re layered between parchment paper so they don’t stick together. A cool, dry spot like a pantry is perfect.
For chocolate made with real cocoa butter, especially darker varieties, it’s best to refrigerate. The cooler temperature prevents melting and helps the chocolate maintain that clean, glossy finish. Before serving, bring them back to room temperature to enjoy the full flavor and texture.
In both cases, avoid keeping them near heat or humidity. Steam from the stove or even a sunny windowsill can change the surface of the chocolate or soften the caramel too much.
Freezing for Longer Storage
If you’re making a big batch of chocolate candy recipes ahead of the holidays or want to stretch out your stash, freezing works surprisingly well. Place the finished clusters on a parchment-lined tray and freeze for about an hour. Once firm, transfer them to a freezer-safe container or bag.
They’ll stay fresh for two to three months this way. To thaw, place them in the fridge first, then let them come to room temperature before serving. That gentle transition helps keep the chocolate from sweating or cracking.
With the right storage, you can enjoy these candies long after the kitchen has been cleaned up and the last gift has been wrapped.
Nutrition Information for Chocolate Candy Recipes
Understanding the nutrition behind your chocolate candy recipes helps you enjoy every bite with balance. Whether you’re gifting them or keeping a stash for yourself, it’s useful to know what’s inside each piece.
Here is the estimated nutritional breakdown per serving (based on 20 pieces total):
| Nutrient | Amount per serving |
| Calories | 317 kcal |
| Total Fat | 18 g |
| Saturated Fat | 10 g |
| Trans Fat | 0.1 g |
| Cholesterol | 12 mg |
| Sodium | 50 mg |
| Total Carbohydrates | 39 g |
| Dietary Fiber | 1 g |
| Sugars | 38 g |
| Protein | 2 g |
| Potassium | 78 mg |
| Calcium | 35 mg |
| Iron | 0.3 mg |
| Vitamin A | 131 IU |
| Vitamin C | 0.3 mg |
For detailed breakdowns of individual ingredients like pecans, chocolate, or caramel components, consult USDA FoodData Central, the authoritative source for food nutrient data.
These values are approximate and can vary depending on the specific ingredients and portion sizes used in your chocolate candy recipes.
Final Thoughts : Why Chocolate Candy Recipes Are Worth Making From Scratch
There’s something deeply satisfying about creating your own chocolate candy recipes from scratch. Not just because they taste incredible, but because you made them. From toasting the pecans to swirling each cluster in melted chocolate, every step becomes a little moment of care, especially when you’re preparing them for someone else.
Maybe your first batch won’t be perfect. Mine definitely wasn’t. But each time you revisit this process, it gets easier. And the results speak for themselves. Whether you’re stacking them into holiday tins, handing them out to neighbors, or quietly sneaking one from the fridge, these little candies carry more than flavor. They carry the story of someone who made something, hands-on, with real attention.
So go ahead. Print the recipe. Try it tonight. Save it for next season. Let it become part of your own collection of go-to chocolate candy recipes that always feel worth it.
More Chocolate Treats to Try
- Magnolia Chocolate Chip Cookie Recipe – Classic, rich, and chewy with the perfect chocolate flavor.
- Chocolate Chip Banana Bread Recipe – Moist banana bread loaded with melty chocolate chips.
- Cranberry Bliss Bars Recipe – A sweet and tangy bar bursting with cranberries and white chocolate.
FAQs About Chocolate Candy Recipes
One of the most surprising things about chocolate candy recipes is how many little questions pop up the first time you make them. I’ve collected some of the most common ones here, based on what I’ve run into myself and what readers often ask. If you’ve ever hesitated mid-recipe, chances are you’ll find your answer below.
1. Can I use a different type of nut?
Yes. While pecans are the traditional choice for their buttery texture, you can absolutely use walnuts, cashews, or even almonds. Just make sure to toast them first for that deep, roasted flavor that works so well in chocolate candy recipes.
2. What if I don’t have corn syrup?
Corn syrup helps prevent the caramel from crystallizing, but if you’re avoiding it, you can try using golden syrup or even honey. Be aware that substitutions may slightly change the texture or set time of your caramel.
3. How do I keep the chocolate from getting dull or streaky?
This often happens when chocolate cools too quickly or is exposed to moisture. Make sure your clusters are completely dry and not too cold when dipping. If you’re using real chocolate (not almond bark), you can also temper it for a shiny, crisp finish, though it’s not essential for success.
4. Can I double or triple the batch?
Definitely. This recipe scales very well, especially if you’re planning to give your candy as gifts or want to prep for a large gathering. Just be sure to microwave in batches if your bowl isn’t large enough to safely handle the caramel mixture.
5. Why did my caramel turn grainy?
Grainy caramel is often the result of overcooking or stirring too little during the heating process. It helps to use the ice water test consistently and to mix thoroughly at regular intervals while microwaving. Also, make sure all your sugar is fully dissolved before heating.
If you ever run into other issues or curiosities while making chocolate candy recipes, don’t hesitate to take notes or tweak the method slightly next time. Each batch brings a little more confidence.