How to make kombucha at home sounds intimidating at first, right? I remember looking at that strange floating SCOBY and thinking, “People actually drink this?” Maybe you are feeling the same mix of curiosity and hesitation.
If you searched for an easy kombucha recipe for beginners, chances are you want something simple, natural, and healthier than soda. That was me too. I wanted a healthy drink from scratch, something fizzy and satisfying without mystery ingredients.
The truth is, learning how to make kombucha at home is much simpler than it looks. With a basic kombucha ingredients list, the right kombucha recipe ratio, and a little patience, you can turn sweet tea into a naturally fermented, probiotic-rich drink that supports gut health.
In the next sections, I will walk you through a homemade kombucha recipe step by step so you can brew confidently and avoid common beginner mistakes.
Learning how to make kombucha at home is easier than most beginners expect once you understand the basic fermentation steps.
Table of Contents
Table of Contents
Kombucha Ingredients List for How to Make Kombucha at Home

Before you even think about fermentation time or flavor combinations, you need to understand the foundation. If you truly want to master how to make kombucha at home, it starts with keeping the ingredient list simple and balanced.
For a classic beginner batch, you only need:
- Filtered water
- Plain black tea
- Organic cane sugar
- A SCOBY with starter liquid
That’s it.
The first time I learned how to make kombucha at home, I expected a complicated list of specialty ingredients. Instead, I found that this healthy drink from scratch relies on everyday staples. What matters most is not complexity, but proportion and quality.
Water creates the base. Tea provides nutrients for the culture. Sugar feeds the yeast and bacteria during fermentation. The SCOBY transforms sweet tea into a living, probiotic-rich drink. When these four elements are balanced correctly, fermentation becomes predictable and safe.
Keeping the ingredient list minimal also reduces the risk of mold or stalled fermentation. Simplicity protects beginners.
Why Black Tea Is Best for a Simple Kombucha Recipe
If you are following an easy kombucha recipe for beginners, black tea is the most reliable option. It contains the tannins and nutrients your SCOBY needs to stay strong and active.
Yes, a kombucha recipe green tea variation is possible. However, green tea can be slightly more delicate, especially for someone new to fermentation for beginners. Black tea is forgiving. It creates a stable environment for the culture and supports consistent fermentation.
Avoid flavored teas, oils like bergamot, or herbal-only blends when learning how to make kombucha at home. These can weaken the SCOBY or disrupt the natural balance of bacteria and yeast.
Once you gain confidence, you can experiment. But in the beginning, stability matters more than creativity.
Understanding the Kombucha Recipe Ratio
This is where many beginners hesitate. Do you really need that much sugar?
Yes. Because the sugar is not for you. It is fuel for the fermentation process.
A standard kombucha recipe 1 gallon batch typically follows this ratio:
- 1 cup sugar
- 8 to 12 cups brewed tea
- 1 to 2 cups starter liquid
This balanced kombucha recipe ratio ensures the pH drops quickly, which protects the batch from harmful bacteria and supports proper fermentation.
If you are making smaller batches, keep the proportions consistent:
- Kombucha recipe 1 litre: 70 to 80 grams sugar
- Kombucha recipe 2 litres: 140 to 160 grams
- Kombucha recipe 3 litres: 210 to 240 grams
- Kombucha recipe 4 litres: 280 to 320 grams
Maintaining proper ratios is one of the most important parts of learning how to make kombucha at home successfully. Too little sugar can weaken fermentation. Too much can delay balance.
When your ingredients are measured correctly, the brewing process becomes much less intimidating and far more predictable.
How to Make Kombucha at Home: First Fermentation Step by Step

Now that your ingredients are ready, this is where how to make kombucha at home moves from theory to practice. The first fermentation is the core of the entire kombucha brewing guide. If this stage is done correctly, everything that follows becomes easier.
Start by boiling about 4 cups of filtered water. Once it reaches a rolling boil, remove it from heat and add your black tea. Let it steep for 8 to 10 minutes to create a strong base. A weak tea can lead to a weak fermentation, especially for beginners.
After steeping, remove the tea bags or strain the loose leaves. While the tea is still hot, stir in your sugar until it is completely dissolved. This step matters more than it seems. Undissolved sugar can create inconsistent fermentation later.
Pour the sweet tea into your clean glass jar. Add the remaining cool filtered water to bring the total volume up and lower the temperature. Before adding your SCOBY, make sure the liquid is at room temperature. If it feels even slightly hot to your touch, wait. Heat can damage the culture and delay the fermentation process.
Gently place the SCOBY into the jar along with 1 to 2 cups of starter liquid. The starter liquid immediately lowers the pH, which is critical for homemade kombucha without mold. This protective acidity prevents unwanted bacteria from developing during the early stages.
Ideal Temperature and Fermentation Time
Cover the jar with a tightly woven cloth and secure it with a rubber band. Airflow is important, but fruit flies must stay out. Place the jar somewhere warm and out of direct sunlight. The ideal temperature range is between 24 and 29 degrees Celsius. If your home is cooler, fermentation will take longer. In warmer climates, such as many parts of India, fermentation may move faster.
How long to ferment kombucha depends largely on temperature. For a standard kombucha recipe 1 gallon batch, the first fermentation typically takes 7 to 12 days. Begin tasting around day 7. The flavor should shift from sweet tea to lightly tart with a subtle vinegar note.
If it still tastes very sweet, give it more time. If it tastes sharply sour, it has fermented longer and can be used for a stronger batch or even as extra starter liquid.
What You Should See During First Fermentation
As you learn how to make kombucha at home, you will notice changes in the jar. Brown string-like particles may form. These are yeast strands and are completely normal. A thin new layer may also develop on the surface. This is a new SCOBY forming.
The liquid may look cloudy. That is part of the natural fermentation process. What you should not see is fuzzy green, black, or white growth. Healthy fermentation looks smooth and slightly glossy on top.
Mastering this first stage builds confidence. Once your kombucha tastes balanced and lightly tart, you are ready to move into the second fermentation kombucha phase, where carbonation and fruit flavor begin to develop.
How to Make Kombucha at Home
Ingredients
- 12 cups filtered water
- 3 tablespoons loose leaf black tea or 6 black tea bags
- 1 cup organic cane sugar
- 1 SCOBY
- 1 to 2 cups starter liquid from previous batch or raw store bought kombucha
Instructions
First Fermentation
- Bring 4 cups of filtered water to a boil.
- Remove from heat and steep tea for 8 to 10 minutes.
- Remove tea leaves or bags and stir in sugar until fully dissolved.
- Pour into a 1 gallon glass jar and add remaining cool water.
- Allow liquid to reach room temperature.
- Add SCOBY and starter liquid.
- Cover with breathable cloth and secure with rubber band.
- Ferment in a warm dark place for 7 to 12 days. Taste starting at day 7.
Second Fermentation (Optional for Fizz)
- Remove SCOBY and reserve with 1 cup kombucha for next batch.
- Pour kombucha into airtight bottles.
- Add fruit or juice for flavor if desired.
- Seal and leave at room temperature 2 to 4 days.
- Refrigerate once carbonation reaches desired level.
Notes
| Nutrient | Approximate Amount |
| Calories | 25 to 40 kcal |
| Total Carbohydrates | 6 to 8 g |
| Sugars (residual) | 4 to 6 g |
| Protein | 0 g |
| Fat | 0 g |
| Sodium | 5 to 10 mg |
| Caffeine | 10 to 15 mg |
| Alcohol | 0.2 to 0.5 percent |
| Probiotics | Variable |
Kombucha Recipe Ratio Guide (1 Litre, 2 Litres, 3 Litres, 4 Litres and 1 Gallon)
If you really want to feel confident about how to make kombucha at home, understanding the kombucha recipe ratio is what removes the guesswork. Most beginner mistakes do not happen because of bad technique. They happen because of inconsistent proportions.
Fermentation is a balance between sugar, tea strength, starter liquid, and temperature. Once that balance is stable, your batches become predictable.
The standard kombucha recipe 1 gallon ratio looks like this:
- 1 cup sugar
- 8 to 12 cups brewed black tea
- 1 to 2 cups starter liquid
- Filtered water to reach 1 gallon total
This ratio creates a safe pH environment quickly, which protects your brew and supports healthy fermentation. If you reduce sugar too much, the SCOBY may weaken. If you reduce starter liquid too much, the acidity may not drop fast enough.
When learning how to make kombucha at home, think in proportions rather than fixed volumes. The culture responds to balance, not container size.
Kombucha Recipe 1 Litre to 4 Litres Conversion
Here is a practical breakdown for smaller metric batches. These ratios follow the same structure as the 1 gallon version.
Kombucha recipe 1 litre
- 70 to 80 grams sugar
- 2 to 3 grams loose leaf black tea or 1 tea bag
- 100 to 150 ml starter liquid
Kombucha recipe 2 litres
- 140 to 160 grams sugar
- 2 tea bags per litre
- 200 to 300 ml starter liquid
Kombucha recipe 3 litres
- 210 to 240 grams sugar
- 6 tea bags total
- 300 to 450 ml starter liquid
Kombucha recipe 4 litres
- 280 to 320 grams sugar
- 8 tea bags total
- 400 to 600 ml starter liquid
The key is consistency. If you keep the kombucha recipe ratio stable, fermentation remains steady regardless of batch size.
Understanding the proper ratios is one of the most important parts of how to make kombucha at home successfully.
Climate Considerations for Kombucha Recipe India and Warm Regions
If you are brewing in a warm climate, such as many areas of India, fermentation may move faster. Higher temperatures accelerate yeast activity, which can make your kombucha turn tart sooner.
In warmer environments:
- Begin tasting earlier, around day 5 or 6
- Avoid reducing sugar too aggressively
- Ensure sufficient starter liquid to maintain safe acidity
Temperature often influences how long to ferment kombucha more than the actual ratio does. In cooler homes, fermentation may stretch to 12 days or longer. In hot kitchens, it may finish in under a week.
When you understand the relationship between ratio and environment, how to make kombucha at home stops feeling unpredictable. It becomes a repeatable system.
With your ratios mastered, the next step is where kombucha truly transforms from fermented tea into a naturally fizzy, fruit flavored kombucha through second fermentation.
Second Fermentation Kombucha Guide (How to Get Fizzy Fruit Flavored Kombucha)

This is the stage most people secretly look forward to. You have completed the first fermentation. Your tea is lightly tart. It smells clean and slightly vinegary. Now you want bubbles. Flavor. That satisfying pop when you open the bottle.
If you are serious about learning how to make kombucha at home, the second fermentation is where your brew becomes exciting.
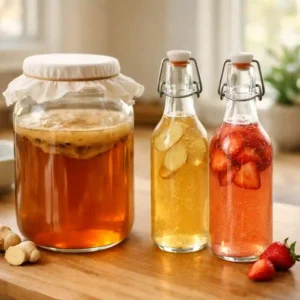
Start by removing the SCOBY from your finished batch. Set it aside in a clean jar with about one cup of kombucha to use as starter for your next brew. What remains in your main jar is fully fermented kombucha ready for bottling.
Pour the kombucha into airtight bottles, preferably swing top glass bottles. Leave about 2 to 3 centimeters of space at the top. This headspace allows pressure to build safely.
Now add flavor.
Mastering this stage is what truly completes the process of how to make kombucha at home.
How Second Fermentation Kombucha Creates Fizz
Carbonation happens when natural sugars from fruit or juice feed the remaining yeast inside a sealed environment. Because the bottle is closed, carbon dioxide cannot escape. It dissolves into the liquid, creating bubbles.
For a standard 500 ml bottle, use:
- 1 to 2 tablespoons fruit puree
- or 30 to 60 ml fruit juice
- or a few slices of fresh fruit
Common beginner combinations include:
- Ginger kombucha
- Strawberry kombucha
- Lemon ginger kombucha
- Pineapple kombucha
Fruit flavored kombucha works best when there is enough natural sugar to trigger carbonation. If you add too little, the drink may remain flat.
Seal the bottles tightly and store them at room temperature in a dark place. This stage typically lasts 2 to 4 days. In warmer climates, especially when applying kombucha recipe India conditions, fermentation may happen faster.
If your kitchen is warm, check bottles daily. Gently open one to test pressure. If carbonation is strong, move them to the refrigerator immediately. Cold temperatures slow fermentation and stabilize fizz.
How Long to Ferment Kombucha in Second Fermentation
The length of second fermentation kombucha depends on temperature and sugar content. At 24 to 29 degrees Celsius, 2 to 3 days is often enough. Cooler environments may require 4 to 5 days.
Signs your kombucha is ready:
- A noticeable hiss when opening
- Fine bubbles rising from the bottom
- A balanced tart and fruity aroma
If it becomes overly sour, it likely fermented too long. If it is flat, it may need more time, more fruit sugar, or a tighter seal.
Understanding this phase is essential when mastering how to make kombucha at home. First fermentation builds structure. Second fermentation builds personality.
Once chilled, your kombucha becomes a naturally fizzy, probiotic-rich drink that fits into healthy drink ideas, natural probiotic drinks routines, and even clean eating drinks plans.
Next, we will explore structured flavor combinations and safe ratios to prevent over carbonation while maximizing taste.
Best Fruit Flavored Kombucha Ideas (Ginger, Strawberry, Lemon Ginger, Pineapple)
Once you understand how to make kombucha at home, flavoring becomes the creative part. This is where your basic fermented tea turns into something you genuinely look forward to drinking.
Fruit flavored kombucha is not just about taste. It also influences carbonation, sweetness, and overall balance. The key is using enough natural sugar to activate second fermentation without creating too much pressure.
If you are following an easy kombucha recipe for beginners, start simple. Choose one fruit. Keep ratios consistent. Observe how your brew responds.
Ginger Kombucha and Lemon Ginger Kombucha
Ginger kombucha is one of the most reliable flavor options. It ferments actively, produces strong carbonation, and adds a clean, slightly spicy finish.
For a 500 ml bottle:
- 1 tablespoon freshly grated ginger
or - 1 tablespoon ginger juice
For lemon ginger kombucha:
- 1 tablespoon ginger
- 1 to 2 teaspoons fresh lemon juice
Ginger stimulates yeast activity, which often increases fizz. If your previous batch was flat, ginger is a safe adjustment. Just monitor pressure daily during second fermentation kombucha to avoid over carbonation.
Strawberry Kombucha and Pineapple Kombucha
Strawberry kombucha creates a softer, slightly sweet profile. It works well for people who are transitioning from soda to natural probiotic drinks.
For a 500 ml bottle:
- 2 tablespoons crushed strawberries
Pineapple kombucha tends to ferment quickly because pineapple contains active enzymes and natural sugars.
For a 500 ml bottle:
- 2 tablespoons pineapple chunks or puree
Pineapple can create strong carbonation within 48 hours in warm climates. If you are brewing in a hotter region, especially under kombucha recipe India conditions, check bottles earlier than usual.
Flavor Balance and Safe Ratios
When learning how to make kombucha at home, consistency protects you from unpredictable results.
General flavor ratio guideline per 500 ml bottle:
- 10 to 15 percent fruit volume
- Leave at least 2 to 3 centimeters headspace
- Store upright at room temperature
If you want lighter sweetness, reduce fruit slightly. If you want stronger carbonation, increase natural sugar sources such as fruit puree instead of adding refined sugar.
Fruit flavored kombucha should enhance the base tea, not overpower it. The goal is balance. Slight tartness, gentle sweetness, active bubbles.
Once chilled, the flavor settles and becomes smoother. Refrigeration slows fermentation and stabilizes carbonation.
At this point in how to make kombucha at home, you are no longer just brewing. You are refining.
Next, we will cover how to prevent mold, fix flat kombucha, and troubleshoot common fermentation problems so your batches stay consistent every time.
Homemade Kombucha Without Mold (Troubleshooting & Fermentation Safety)
If you are serious about mastering how to make kombucha at home, you need to understand what is normal and what is not. Fermentation can look strange, especially the first time. Cloudiness, floating strands, new layers forming on top. It can feel slightly unsettling.
But most of what you see is completely normal.
During healthy fermentation, you may notice:
- Brown string-like strands in the liquid
- A cloudy appearance
- A thin new SCOBY layer forming on the surface
- Small bubbles collecting along the sides of the jar
These are all signs that your fermentation is active. They are not contamination.
What you do not want to see is fuzzy growth. Mold appears dry and hairy. It is usually green, black, or white and sits on the surface. If you see anything fuzzy, discard the entire batch. Do not try to save it.
Preventing mold is largely about balance. When learning how to make kombucha at home, most contamination issues come from one of three mistakes:
- Not enough starter liquid
- Weak tea concentration
- Poor sanitation
Your kombucha recipe ratio protects you. The starter liquid lowers the pH quickly, creating an acidic environment that harmful bacteria cannot survive in. That is why reducing starter liquid too much increases risk.
Why Fermentation Fails Sometimes
Even when you follow an easy kombucha recipe for beginners, batches can behave differently depending on temperature and environment.
If your kombucha tastes overly sweet after 10 days, the room may be too cold. Fermentation slows significantly below 21 degrees Celsius.
If it tastes extremely sour very quickly, the room may be too warm. High temperatures accelerate yeast activity.
If your kombucha is flat after second fermentation kombucha, common causes include:
- Bottles not fully airtight
- Not enough fruit sugar added
- Fermentation period too short
- Refrigerating too early
Flat kombucha does not mean failure. It simply needs more time or more natural sugar during the second fermentation stage.
Clean Equipment and Consistency Matter
One of the simplest ways to protect your homemade fermented drinks is to clean everything thoroughly. Wash jars with hot water and mild soap. Rinse completely to remove residue. Avoid harsh chemical cleaners that may leave antibacterial traces.
Use glass containers. Avoid metal contact during long fermentation periods, as acidity can react with certain metals.
Consistency builds confidence. When you follow the same kombucha ingredients list, maintain a stable kombucha recipe ratio, and monitor temperature, fermentation becomes predictable.
Learning how to make kombucha at home is not about perfection. It is about understanding patterns. Once you recognize what healthy fermentation looks like, you stop worrying and start trusting the process.
Next, we will take a balanced look at kombucha benefits, gut health claims, and whether kombucha is truly good for you.
Kombucha Benefits: Is Kombucha Good for You, Gut Health and Weight Loss Claims

Once you learn how to make kombucha at home, the next natural question is not about flavor. It is about benefits. Is kombucha good for you? Or is it just another wellness trend that sounds impressive but does very little?
The honest answer sits somewhere in the middle.
Kombucha is a fermented tea, which means it contains organic acids, small amounts of probiotics, and trace nutrients produced during fermentation. Because it is one of many natural probiotic drinks, people often associate it with improved digestion and overall gut balance.
Many people start researching how to make kombucha at home because they want a healthier alternative to sugary drinks.
Kombucha for Gut Health
When brewed correctly, kombucha contains live cultures. These beneficial bacteria may support digestive balance, especially if your diet previously lacked fermented foods. That is why kombucha for gut health has become a popular search term.
However, it is important to keep expectations realistic. Kombucha is not a medical treatment. It is a fermented beverage that can complement a balanced diet. Think of it as one piece of a larger picture that includes fiber, whole foods, and overall healthy eating patterns.
If you are replacing sugary soda with homemade fermented drinks, that alone can improve how you feel day to day. Less refined sugar. Fewer additives. More mindful consumption.
Kombucha for Weight Loss and Detox Claims
Kombucha for weight loss is another common topic. The truth is simple. Kombucha itself does not magically burn fat.
What it can do is replace higher calorie beverages. If someone switches from soda to a lightly tart homemade kombucha with reduced residual sugar, calorie intake may naturally decrease. That indirect effect can support weight management over time.
You may also hear it described as a detox drink recipe or included among immune boosting drinks. While kombucha contains acids like acetic acid and small amounts of antioxidants from tea, your liver already performs detoxification efficiently on its own.
Learning how to make kombucha at home gives you control over sugar levels and ingredients. That control is what makes it appealing in clean eating drinks routines. Not exaggerated claims.
A Balanced Perspective
When consumed in moderate amounts, usually 120 to 240 ml per day for beginners, kombucha can be part of healthy drink ideas without excess sugar. It is not a miracle cure. It is not a replacement for medical advice.
What makes kombucha interesting is not hype. It is the fermentation process itself. Turning sweet tea into a living beverage using time and microbes feels empowering. It connects you to traditional methods of preserving and transforming food.
If your goal is to support gut health, reduce soda intake, or explore fermentation for beginners, kombucha can be a valuable addition.
Now that we have covered benefits and realistic expectations, the final step in mastering how to make kombucha at home is understanding long term SCOBY care and maintaining consistent batches.
How to Make Kombucha at Home: Starter Guide and SCOBY Care
If you truly want to master how to make kombucha at home, learning how to care for your SCOBY is what turns a one time experiment into a sustainable habit. Brewing once is easy. Brewing consistently requires a little attention and rhythm.
After each batch, remove your SCOBY carefully with clean hands. Place it in a glass jar with about one cup of finished kombucha. This liquid becomes your starter for the next batch. It keeps the culture acidic and protected between brews.
Your SCOBY may look thicker over time. It may also produce new layers with each fermentation. That is completely normal. Each batch creates what many brewers call a baby SCOBY. You can separate them gently if the layers become too thick, or keep them stacked.
Long term consistency is what turns learning how to make kombucha at home into a sustainable habit.
How to Store a SCOBY Between Batches
If you plan to brew again within a few days, simply leave the SCOBY in a small amount of kombucha at room temperature. Keep it covered with a breathable cloth.
If you need a longer break, you can create what is commonly called a SCOBY hotel. This is simply a larger jar where you store multiple SCOBY layers submerged in kombucha. Add fresh sweet tea occasionally to keep the culture fed.
When learning how to make kombucha at home, beginners sometimes panic if the SCOBY sinks or tilts sideways. That is normal. It may float. It may sink. A new layer usually forms at the surface regardless of what the original culture does.
Maintaining Consistent Fermentation
Consistency is what keeps your batches predictable.
- Use the same kombucha recipe ratio each time
- Maintain similar room temperature
- Always include enough starter liquid
- Clean jars thoroughly before each brew
If you ever skip brewing for several weeks, taste the stored liquid before reusing it. If it smells strongly unpleasant or shows any sign of mold, discard it and start fresh.
A healthy SCOBY smells mildly vinegary, not rotten or musty.
Learning how to make kombucha at home is really about understanding this cycle. Brew. Bottle. Save starter. Repeat. Over time, it becomes second nature.
When your culture is healthy, your fermentation remains stable. And when your fermentation is stable, you can experiment confidently with flavor, strength, and batch size.
Nutrition Information for How to Make Kombucha at Home (Per 240 ml Serving)
When learning how to make kombucha at home, one of the most common questions is about nutrition. Because fermentation consumes most of the sugar, the final values depend on fermentation length and how much sweetness remains before bottling.
The numbers below reflect an average batch of homemade kombucha fermented for 7 to 10 days with a standard kombucha recipe ratio. Longer fermentation usually lowers sugar slightly and increases acidity.
Estimated Nutrition per 240 ml (1 cup)
| Nutrient | Approximate Amount |
| Calories | 25 to 40 kcal |
| Total Carbohydrates | 6 to 8 g |
| Sugars (residual) | 4 to 6 g |
| Protein | 0 g |
| Fat | 0 g |
| Sodium | 5 to 10 mg |
| Caffeine | 10 to 15 mg |
| Alcohol (natural fermentation) | 0.2 to 0.5 percent |
| Probiotics | Variable, strain dependent |
According to official nutritional data from the USDA (United States Department of Agriculture), fermented tea beverages like kombucha generally contain relatively low calories and reduced residual sugars after fermentation, making them a lighter alternative to sugary sodas.
These values are estimates because homemade fermented drinks naturally vary. Factors that influence final nutrition include:
- Length of first fermentation
- Amount of sugar originally added
- Strength of tea used
- Whether fruit was added during second fermentation
- Storage time
If you allow fermentation to continue longer, residual sugar decreases and acidity increases. If you bottle earlier for a sweeter profile, sugar content will be slightly higher.
Compared to soda or sweetened juice, kombucha is significantly lower in sugar when brewed properly. That is why many people include it among healthier drink ideas or natural probiotic drinks.
Keep in mind that while kombucha contains beneficial acids and live cultures, it is not a replacement for a balanced diet. It works best as part of a broader clean eating approach.
At this stage, you now understand every essential step involved in how to make kombucha at home.
Conclusion: Mastering How to Make Kombucha at Home with Confidence
At this point, you are no longer just reading about how to make kombucha at home. You understand the ingredients, the kombucha recipe ratio, the first fermentation, the second fermentation, flavoring, troubleshooting, and SCOBY care. That already puts you ahead of most beginners.
What often surprises people is how simple the process actually becomes after the first batch. The steps feel technical in the beginning. You check the temperature twice. You watch the jar carefully. You taste cautiously. Then, somewhere around the second or third batch, it shifts. Brewing turns into rhythm.
How to make kombucha at home is less about strict perfection and more about understanding balance. Tea strength. Sugar proportion. Starter liquid. Temperature. When those elements stay consistent, fermentation becomes predictable.
You also gain something else. Control. You control the sweetness. You control the flavor intensity. You control the ingredients. That is what makes a homemade fermented drink different from store bought options. It becomes part of your routine, not just something you grab off a shelf.
If your goal was to create a healthy drink from scratch, reduce soda intake, or explore fermentation for beginners, you now have a structured kombucha brewing guide to follow. You know how long to ferment kombucha. You know how to scale from 1 litre to 1 gallon. You know how to prevent mold and how to build carbonation safely.
Start simple. Brew one batch. Observe. Adjust. Repeat.
That is how confidence is built in fermentation.
Now you fully understand how to make kombucha at home safely, consistently, and confidently.
More Healthy Drinks You’ll Love
- Homemade Gatorade – A natural electrolyte drink for hydration.
- Green Tea with Honey – Light, antioxidant-rich, and soothing.
- Jamu Recipe – A traditional wellness drink packed with anti-inflammatory benefits.
- Best Detox Smoothie for Weight Loss – A nutrient-dense blend to refresh your routine.
FAQs About How to Make Kombucha at Home
1. How long does it take to make kombucha at home?
When learning how to make kombucha at home, the full process typically takes 9 to 16 days. The first fermentation usually lasts 7 to 12 days depending on room temperature. The second fermentation for carbonation adds another 2 to 4 days. Warmer environments shorten fermentation time, while cooler spaces extend it.
2. How long should I ferment kombucha for the best taste?
For most beginners following an easy kombucha recipe for beginners, fermentation is ideal when the tea tastes lightly tart but not sharply sour. Start tasting around day 7. If it still tastes sweet, allow more time. Flavor preference ultimately determines the final fermentation length.
3. Can I use green tea instead of black tea?
Yes, a kombucha recipe green tea variation works, but black tea is more stable for beginners. Green tea produces a lighter flavor profile and may ferment slightly differently. For your first batches, plain black tea provides more consistent results.
4. Why is my homemade kombucha not fizzy?
Flat kombucha usually means the second fermentation kombucha stage needs adjustment. Common causes include bottles not fully airtight, not enough fruit sugar added, refrigerating too early, or fermentation time being too short. Adding ginger or pineapple during second fermentation often increases carbonation naturally.
5. What is the correct kombucha recipe ratio?
A standard kombucha recipe 1 gallon ratio includes 1 cup sugar, 8 to 12 cups brewed tea, and 1 to 2 cups starter liquid. Smaller batches like a kombucha recipe 1 litre or 2 litres should maintain proportional sugar and starter liquid amounts to ensure safe fermentation and proper acidity levels.
6. How do I make homemade kombucha without mold?
To prevent mold when learning how to make kombucha at home, always use enough starter liquid, brew strong tea, keep fermentation in a warm and clean environment, use filtered water, and avoid contaminating the jar. Mold appears fuzzy and dry, often green, black, or white. If you see fuzzy growth, discard the batch completely.
7. Is kombucha good for you every day?
Kombucha can be part of healthy drink ideas when consumed in moderation. Many people drink 120 to 240 ml daily. Because it is a fermented beverage with trace caffeine and natural acids, moderation is recommended, especially for beginners.
8. Can I reduce the sugar in kombucha?
Sugar is necessary for fermentation because it feeds the SCOBY. While most of the sugar is consumed during fermentation, drastically reducing it can weaken the process and create unstable batches. Following the proper kombucha recipe ratio keeps fermentation balanced and safe.