Classic dessert recipes remind us why baking is more than just cooking; it is creating memories. The scent of fresh banana bread or warm cookies brings back moments of comfort and family connection. These traditional treats, simple yet full of flavor, have lasted through generations because they celebrate love, nostalgia, and togetherness. Whether it is the soft sweetness of banana bread, the rich taste of Magnolia chocolate chip cookies, the cozy crumble of baked apples, or the playful crunch of candied grapes, each dessert tells a story. Unlike modern creations that focus on innovation, these timeless recipes focus on joy and simplicity.
Classic dessert recipes also represent a tradition that never fades. They require only basic ingredients and a touch of care, proving that the best desserts come from the heart. Baking them is not just about satisfying a craving; it is about keeping traditions alive and sharing happiness with every bite.
Table of Contents
Table of Contents
The Secret Behind Classic Desserts
Every time I bake one of my favorite classic dessert recipes, I am reminded that their magic lies in something far deeper than sugar and flour. The real secret behind these timeless creations is how they blend emotion, simplicity, and tradition into every bite. They are more than desserts. They are experiences that comfort and connect us to moments we never want to forget.
The Role of Comfort and Nostalgia
The true charm of classic dessert recipes comes from the way they make us feel. A freshly baked cookie can turn an ordinary afternoon into something special. A warm apple crumble shared at the dinner table can bring smiles after a long day. These desserts invite warmth and comfort because they are linked to memories of home and love. They are the flavors of childhood and togetherness, and that is why people return to them again and again.
I often tell my readers that nostalgia is the most powerful ingredient in any recipe. You can taste it in every bite of banana bread that reminds you of your grandmother’s kitchen or every spoonful of pudding that feels like a familiar hug. These feelings are the heart of what makes classic dessert recipes truly timeless.
Traditional Ingredients That Make All the Difference
Another reason these classic dessert recipes endure is their simplicity. The same few ingredients have been used for decades, creating flavors that never disappoint. Butter, eggs, sugar, flour, and a touch of vanilla form the base of so many traditional sweets. These humble components work together beautifully, producing desserts that are rich, comforting, and satisfying.
Modern recipes may try to reinvent these classics, but the truth is that the original versions already strike the perfect balance between flavor and texture. Whether it is the soft crumb of banana bread, the crisp edge of a cookie, or the golden top of an apple crumble, every element feels familiar and comforting.
Classic desserts also offer flexibility. You can make small tweaks, like adding nuts or spices, without losing their original essence. That adaptability is part of their charm and a key reason they remain so beloved today.
In every sense, the secret of classic dessert recipes lies in their heart. They connect generations, awaken memories, and remind us that happiness can be as simple as a homemade treat shared with someone you love.
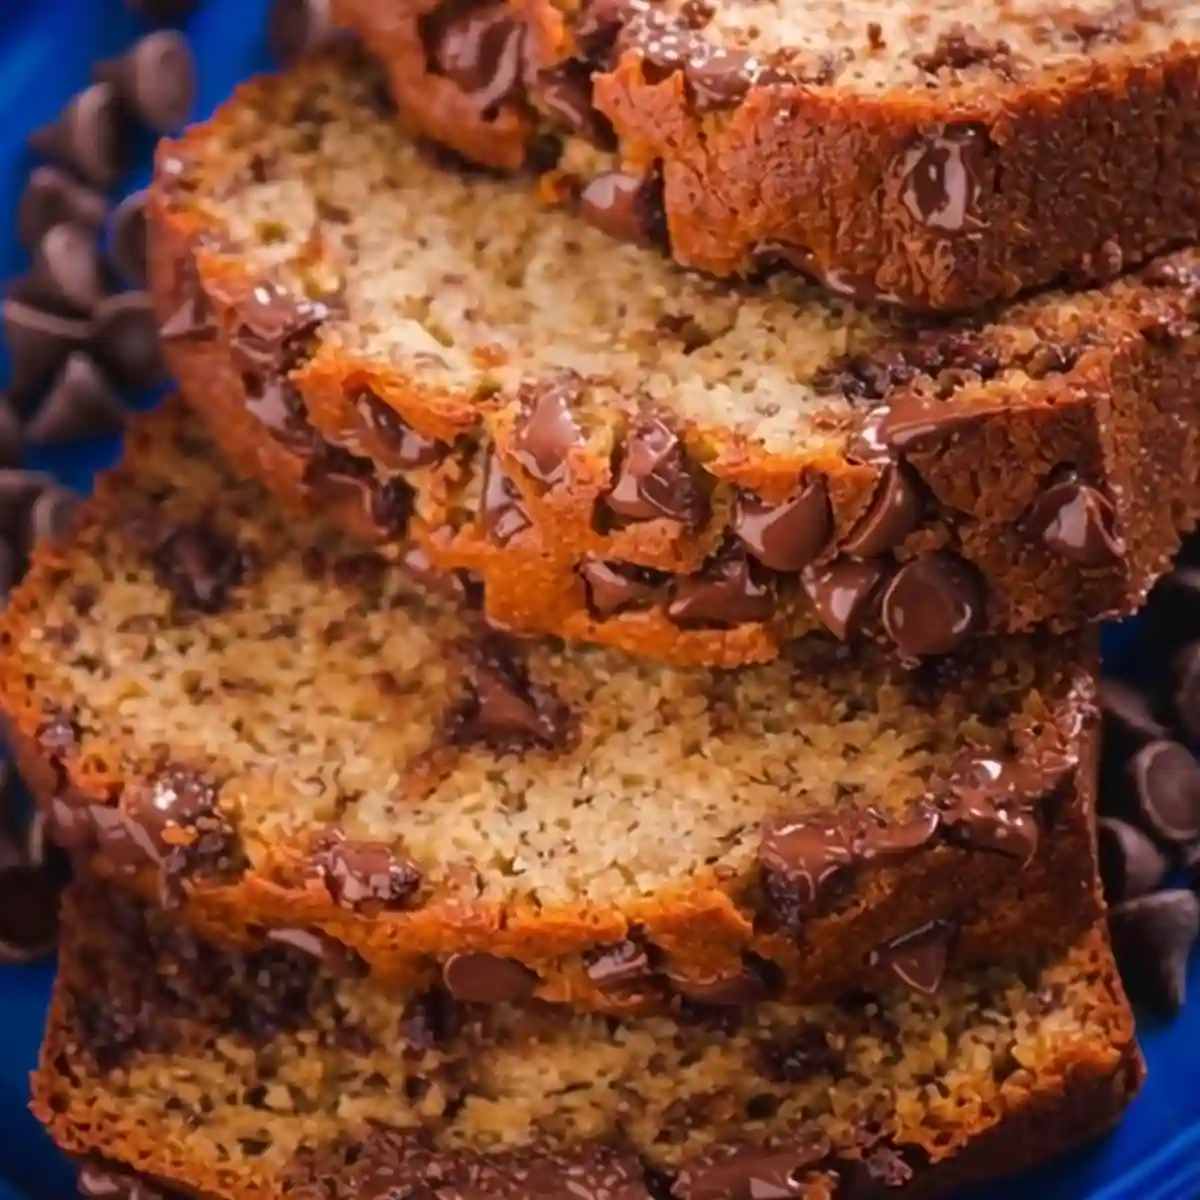
Chocolate Chip Banana Bread Recipe – A Perfectly Moist Classic
If there is one dessert that truly defines comfort baking, it is banana bread. Among all classic dessert recipes, this one stands out as a symbol of warmth and simplicity. I still remember the first time I baked it. The kitchen smelled like home, the loaf rose beautifully in the oven, and the first slice tasted like pure happiness. When you add chocolate chips to that soft, sweet base, it becomes irresistible.
Classic Dessert Recipes
Ingredients
Method
- Set your oven to 350°F or 180°C. Lightly grease a standard loaf pan or line it with parchment paper.
- In a large mixing bowl, mash the bananas with a fork until smooth. Lumps are fine, but the more mashed they are, the more moisture they’ll bring.
- Pour the melted butter into the mashed bananas. Stir until fully combined and glossy.
- Add the brown sugar, egg, and vanilla extract. Mix until everything looks blended and smooth.
- Sprinkle in the baking soda and salt first, then add the flour. Gently stir everything together just until you no longer see streaks of flour. Do not overmix or the bread may turn out dense.
- Add most of the chocolate chips and gently fold them into the batter. Leave a few chips aside for sprinkling on top.
- Pour the batter into the prepared pan. Use a spatula to even out the top. Add the remaining chocolate chips on top.
- Place in the oven and bake for 50 to 60 minutes. The top should be golden brown and a toothpick inserted in the center should come out with a few moist crumbs.
- Let the loaf cool in the pan for 10 to 15 minutes. Then transfer it to a wire rack and cool fully before slicing. This helps lock in the moisture and makes cutting easier.
Notes
Calories: 379
Fat: 15g
Carbohydrates: 56g
Fiber: 3g
Sugar: 28g
Protein: 5g
Ingredients You Will Need
To make the perfect chocolate chip banana bread, you do not need any fancy tools or rare ingredients. Everything you need is probably already in your kitchen.
Here is what you will need:
• 3 very ripe bananas, mashed until smooth
• 75 grams of unsalted butter, melted
• 100 grams of brown sugar, packed
• 1 large egg, at room temperature
• 1 teaspoon of pure vanilla extract
• 1 teaspoon of baking soda
• A small pinch of salt to balance sweetness
• 185 grams of all-purpose flour, spooned and leveled
For the mix-ins
• 85 grams of mini chocolate chips, plus a few extra for topping if desired
Optional but helpful: lightly grease your loaf pan or line it with parchment paper for easy removal.
Step-by-Step Preparation
1. Preheat your oven
Set your oven to 350°F or 180°C. Lightly grease a standard loaf pan or line it with parchment paper.
2. Mash the bananas
In a large mixing bowl, mash the bananas with a fork until smooth. Lumps are fine, but the more mashed they are, the more moisture they’ll bring.
3. Add melted butter
Pour the melted butter into the mashed bananas. Stir until fully combined and glossy.
4. Mix in wet ingredients
Add the brown sugar, egg, and vanilla extract. Mix until everything looks blended and smooth.
5. Add dry ingredients
Sprinkle in the baking soda and salt first, then add the flour. Gently stir everything together just until you no longer see streaks of flour. Do not overmix or the bread may turn out dense.
6. Fold in chocolate chips
Add most of the chocolate chips and gently fold them into the batter. Leave a few chips aside for sprinkling on top.
7. Transfer to loaf pan
Pour the batter into the prepared pan. Use a spatula to even out the top. Add the remaining chocolate chips on top.
8. Bake
Place in the oven and bake for 50 to 60 minutes. The top should be golden brown and a toothpick inserted in the center should come out with a few moist crumbs.
9. Cool completely
Let the loaf cool in the pan for 10 to 15 minutes. Then transfer it to a wire rack and cool fully before slicing. This helps lock in the moisture and makes cutting easier.
The result is a loaf that is golden on the outside and incredibly soft inside, with melted chocolate scattered throughout each bite.
Tips for the Perfect Texture
The secret to a moist and flavorful banana bread is using overripe bananas. The darker and softer they are, the sweeter your bread will be. Avoid overmixing the batter because it can make the texture dense instead of tender. If you like extra richness, you can add a spoon of yogurt or sour cream to the mix. Like all classic dessert recipes, it’s about patience, balance, and care.
For a beautiful finish, sprinkle a few extra chocolate chips on top before baking. Once baked, the shiny chocolate spots will make your loaf look bakery-perfect.
Why It Belongs Among the Best Classic Dessert Recipes
Banana bread has become one of the most beloved classic dessert recipes because it is easy, versatile, and comforting. It works for breakfast, snacks, or even as a sweet treat after dinner. It can be customized with nuts, cinnamon, or even peanut butter chips. But even in its simplest form, it is a dessert that feels like home. Each slice tells a story of care, patience, and tradition.
So next time you see overripe bananas sitting on your counter, do not throw them away. Turn them into something special. Bake a loaf of chocolate chip banana bread and fill your home with the aroma of happiness.
Magnolia Chocolate Chip Cookie Recipe – Bakery-Style Perfection
When it comes to classic dessert recipes, few treats bring as much joy as a warm chocolate chip cookie fresh from the oven. Soft in the center, crisp at the edges, and packed with melting chocolate chips, these cookies capture the heart of classic dessert recipes everywhere. My first experience with Magnolia Bakery’s cookies was unforgettable. I remember walking into the bakery and being instantly greeted by the buttery, sweet aroma that filled the air. One bite, and I knew I had discovered something special.

The best part is that you can recreate that same bakery-style perfection right in your own kitchen. Just like many classic dessert recipes, this one is simple, satisfying, and perfect for every occasion, from a cozy night at home to an elegant dessert platter.
The Story Behind Magnolia Bakery’s Famous Cookies
Magnolia Bakery, originally famous for its cupcakes, has become a true symbol of American comfort baking. Their chocolate chip cookies quickly gained a loyal following because they combine nostalgic flavor with a professional finish. What makes them stand out is their balance: slightly crisp around the edges and irresistibly chewy in the center. They taste just like home but look like something from a pastry shop, which is why they’re often mentioned among the best classic dessert recipes in the world
Ingredients You Will Need
To make your own batch of Magnolia-style cookies, gather these ingredients:
• 2 and ½ cups all-purpose flour
• 1 heaping teaspoon baking soda
• ½ teaspoon salt
• 8 tablespoons unsalted butter, softened
• 2 cups light brown sugar, packed
• 2 eggs, room temperature
• 1 and ½ teaspoons pure vanilla extract
• 1 and ½ cups semisweet chocolate chips
Step-by-Step Preparation
- Preheat your oven to 350°F or 175°C. Line a baking sheet with parchment paper so the cookies release easily after baking.
- In a medium bowl, mix the flour, baking soda, and salt. Stir gently until fully blended, then set aside.
- In a large bowl, cream the softened butter and packed brown sugar using a hand mixer or a sturdy whisk. Mix until the texture turns light and fluffy. This step helps create that soft chewy center.
- Add the eggs one at a time. Mix just until each egg blends into the dough. Add the vanilla and stir again.
- Gradually add the dry flour mixture into the wet ingredients. Stir slowly using a spatula or wooden spoon. Stop mixing once the flour disappears to avoid overworking the dough.
- Fold in the semisweet chocolate chips. Make sure they are evenly distributed through the dough.
- Scoop large spoonfuls of dough and place them on your prepared baking sheet. Leave some space between each cookie to allow for spreading.
- Bake for 10 to 11 minutes. Remove the cookies when the edges are golden and the centers still look slightly soft. This keeps them moist and chewy.
- Let the cookies sit on the pan for one minute. Then transfer them to a wire rack to cool completely.
- Repeat until all the dough is used. Store cooled cookies in an airtight container to keep them fresh.
Baking Tips for the Perfect Texture
If you want your cookies to have that signature chewy texture, chill your dough for about 30 minutes before baking. This helps the cookies hold their shape and enhances the flavor. Also, avoid overbaking them. They should still look slightly soft in the middle when you take them out of the oven because they continue to cook as they cool.
For an extra indulgent touch, sprinkle a tiny pinch of sea salt on top of each cookie right after baking. It enhances the chocolate flavor and adds a subtle, delicious contrast. Like many classic dessert recipes, this one proves that simple techniques often lead to the most rewarding results.
Why These Cookies Define Classic Dessert Recipes
Magnolia chocolate chip cookies represent everything we love about classic dessert recipes. They are simple, comforting, and full of flavor, yet elegant enough to serve at any gathering. Every bite combines nostalgia with a touch of bakery brilliance. These cookies remind us that perfection can come from the simplest ingredients when made with care. Bake them once, and they will become your go-to recipe whenever you crave a little sweetness a true staple among classic dessert recipes that never fail to impress.
Simple Apple Crumble – The Quintessential Comfort Dessert
Among all classic dessert recipes, the simple apple crumble is one that truly captures the heart. It is rustic, warm, and endlessly comforting. Whenever I bake it, my kitchen fills with the scent of caramelized apples and cinnamon, and I can instantly feel the calm that only homemade desserts bring. This recipe is proof that the simplest ingredients can create the most memorable flavors, which is exactly what defines the best classic dessert recipes.

The History of Apple Crumble
The apple crumble has humble beginnings. It became popular during World War II in Britain when ingredients like sugar and butter were limited. Instead of using a traditional pie crust, home bakers created a simple topping from flour, butter, and sugar. That clever idea turned into one of the most loved classic dessert recipes of all time. What started as a practical solution became a symbol of comfort, simplicity, and warmth.
Even today, apple crumble continues to be a favorite across generations. It is often served at family gatherings, Sunday lunches, and holiday dinners because it feels like home in every bite. The soft apples, the golden crumbly topping, and the sweet aroma all come together to create a dessert that is timeless, just like other classic dessert recipes that bring people closer.
Ingredients You Will Need
Here is what you need to make a delicious apple crumble that melts in your mouth:
- Flour – All-purpose flour keeps the topping light and crumbly. Whole wheat flour works for a rustic, nutty flavor.
- Oats – Rolled oats give texture and that signature crisp bite. Skip them if you prefer a classic crumble topping without oats.
- Butter – Cold butter is key. Rubbing it into the flour and sugar creates those irresistible buttery crumbs.
- Sugar – Light brown sugar brings caramel flavor. A mix of white and brown sugar works too.
- Salt – Just a pinch balances the sweetness.
Tips for Homemade Crumble Topping
- Use cold butter – It stops the topping from melting into the apples and keeps it crisp.
- Don’t overmix – Leave some larger chunks for extra crunch.
- Adjust sugar – For a healthier apple crumble, cut the sugar slightly or use coconut sugar.
- Add extras – A handful of chopped nuts or a sprinkle of cinnamon makes your topping unique.
Step-by-Step Preparation
Step 1: Prepare the Apples
Peel, core, and slice the apples into bite-sized pieces. Toss them in a bowl with a little flour, sugar, cinnamon, and lemon juice until coated. This mixture keeps the filling thick and prevents it from becoming watery.
Step 2: Mix the Topping
In another bowl, combine flour, oats, brown sugar, and a pinch of salt. Add cold butter and rub it into the mixture with your fingertips until you get coarse crumbs. Some bigger chunks are welcome because they add crunch.
Step 3: Assemble the Crisp
Pour the apple mixture into a greased baking dish. Evenly scatter the crumble topping over the fruit, making sure the apples are completely covered.
Step 4: Bake to Perfection
Place the dish in a preheated oven at 180C or 375F. Bake for about 35 to 40 minutes until the topping is golden brown and the filling is bubbling around the edges.
Step 5: Rest and Serve
Let the crisp sit for a few minutes after baking. Serve warm with vanilla ice cream, custard, or whipped cream.
The beauty of this recipe lies in its simplicity. Every spoonful gives you a delightful contrast of textures: tender spiced apples and a crisp buttery crumble. It’s that honest comfort that makes apple crumble stand out among classic dessert recipes loved by every generation.
Creative Variations to Try
Once you master the basic version, you can experiment with different flavors. Add a handful of berries for extra color and sweetness, mix chopped nuts into the crumble for crunch, or drizzle caramel sauce over the top before serving. You can also use pears or peaches instead of apples for a fresh twist while keeping the same comforting essence found in most classic dessert recipes.
For a cozy serving idea, pair your apple crumble with a scoop of vanilla ice cream or a dollop of whipped cream. The contrast between the warm dessert and the cold topping makes every bite even more satisfying.
Why Apple Crumble Remains a Star in Classic Dessert Recipes
The simple apple crumble continues to shine because it captures everything that makes classic dessert recipes special. It uses easy-to-find ingredients, takes little effort, and always delivers comfort. Whether baked for a family dinner or shared with friends on a rainy afternoon, it brings people together. Every bite reminds us that true satisfaction often comes from the simplest things.
If you ever need a dessert that feels like a hug in a bowl, this is it. Sweet, soft, and endlessly inviting, the apple crumble will forever remain a favorite among classic dessert recipes that celebrate love and warmth.
Candied Grapes Recipe – A Sweet and Crunchy Trend
Among all classic dessert recipes, candied grapes stand out as a playful and modern twist on traditional sweets. They are simple to make, beautiful to look at, and incredibly fun to eat. I still remember the first time I made them for a family gathering. Everyone’s eyes lit up when they saw the sparkling grapes glistening like tiny jewels. Within minutes, the plate was empty, and I knew I had found a new favorite that perfectly balanced freshness and sweetness a fun addition to my favorite classic dessert recipes.

What Makes Candied Grapes So Popular
Candied grapes have become a viral sensation on social media, but their charm lies in their simplicity. Unlike most desserts that require baking, these can be made in just a few minutes with minimal effort. They combine the natural juiciness of grapes with a crisp sugary coating that cracks beautifully with every bite. The result is a refreshing treat that satisfies both your sweet tooth and your craving for something light, showing how classic dessert recipes can evolve without losing their soul.
This recipe perfectly fits the modern take on classic dessert recipes. It brings the same homemade warmth as traditional treats but with a contemporary touch that appeals to today’s dessert lovers.
Ingredients You Will Need
You will need only a few ingredients for this simple recipe:
• Seedless grapes (green or red)
• 1 packet of Jello powder or Kool-Aid
• 1 to 2 tablespoons granulated sugar (optional for better texture and shimmer)
• Ziplock bag or small bowl for coating
Pro Tip for Better Coating
Mix the Jello or Kool-Aid powder with a bit of granulated sugar. This makes the coating stick better and gives the grapes a glossy, candy-coated look.
Step-by-Step Preparation
- Wash the Grapes
Rinse your grapes well and leave them slightly damp. Do not dry them completely. They need a bit of moisture for the powder to stick. - Prepare the Coating
In a bowl or ziplock bag, mix the flavored powder with a small amount of granulated sugar if using. - Roll or Shake
Roll the grapes in the powder or shake them in the bag until coated evenly. Do a few at a time for best results. - Let Them Set
Place the coated grapes on a tray or plate. You can chill them in the fridge for 30 minutes to help the coating stick better.
Once set, the grapes will have a crunchy exterior that gives way to a juicy burst of flavor inside. They are perfect for parties, dessert tables, or even as a fun after-dinner treat inspired by classic dessert recipes that emphasize joy and creativity.
Flavor Ideas and Toppings
One of the best things about candied grapes is how versatile they are. You can experiment with different colors, flavors, and coatings. For a fruity twist, roll the grapes in flavored gelatin powder. If you want extra crunch, use crushed hard candies or even a light dusting of coconut flakes. For a more elegant touch, sprinkle a little edible glitter on top. The possibilities are endless, and each variation adds its own charm, making candied grapes a modern favorite among classic dessert recipes lovers.
Why Candied Grapes Deserve a Spot Among Classic Dessert Recipes
Although candied grapes are a modern addition, they perfectly complement the world of classic dessert recipes. They prove that desserts can evolve while keeping the spirit of simplicity and joy that defines traditional favorites. They require no baking, no special tools, and no long waiting time, yet they bring smiles and spark excitement every time they are served.
Candied grapes show that even a small idea can become a delightful classic. Whether you serve them as a snack, a party treat, or a playful dessert centerpiece, they capture the same timeless feeling of sweetness and creativity that all classic dessert recipes share.
Serving Suggestions for Classic Desserts
One of the most delightful parts of baking classic dessert recipes is sharing them. A beautifully served dessert not only pleases the taste buds but also delights the eyes. Presentation adds personality, emotion, and a touch of magic to every treat. Whether you are preparing a family dinner, a small celebration, or a cozy evening snack, knowing how to serve your desserts can transform a simple sweet into a memorable experience that celebrates classic dessert recipes at their best.
Perfect Pairings: Ice Creams, Sauces, and Drinks
The right pairing can elevate your dessert from good to unforgettable. A warm slice of chocolate chip banana bread tastes heavenly with a scoop of vanilla ice cream or a drizzle of chocolate sauce. The contrast between the moist bread and the cold ice cream makes every bite more satisfying, a hallmark of all classic dessert recipes.
For your Magnolia chocolate chip cookies, a classic glass of cold milk is always a winner. If you want to add a gourmet touch, try serving them with a cappuccino or an iced mocha. The balance of sweet and bitter flavors makes a perfect combination.
A simple apple crumble pairs beautifully with whipped cream, custard, or caramel sauce. The creamy toppings highlight the spiced apple filling and buttery crumble topping. For a seasonal twist, you can serve it with cinnamon ice cream during autumn or a scoop of lemon sorbet in the summer.
And if you are serving candied grapes, consider pairing them with sparkling water or a fruity mocktail. Their refreshing sweetness complements citrus-based drinks, making them a perfect light dessert for warm days and adding variety to your collection of classic dessert recipes
Presentation Tips for a Stunning Dessert Table
A good presentation makes your desserts as appealing to the eyes as they are to the palate. Here are a few simple tips to make your desserts stand out:
- Use contrast – Serve light-colored desserts like banana bread or apple crumble on dark plates and rich, chocolatey treats on white or pastel plates. The difference in color makes your dessert pop.
- Add garnish – A sprinkle of powdered sugar, cocoa, or cinnamon instantly gives a professional touch. Fresh mint leaves, berries, or edible flowers can also add a pop of color.
- Serve in individual portions – Use small glass jars, ramekins, or cups for puddings and crumbles. They look elegant and are easy to serve.
- Highlight textures – Leave one slice or portion slightly separated so guests can see the layers or fillings. It adds visual appeal and invites curiosity.
- Keep it clean and minimal – Avoid overcrowding your dessert table. Sometimes, less is more. Allow each dessert to shine.
I often remind home bakers that you do not need expensive serveware to make desserts look beautiful. A touch of creativity, natural light, and a few decorative details can make all the difference. Even a simple loaf of banana bread looks charming when sliced neatly and arranged on a wooden board with a few chocolate chips scattered around a timeless trick loved by fans of classic dessert recipes.
Why Presentation Matters in Classic Dessert Recipes
Beautifully served desserts show care and attention, two values at the heart of classic dessert recipes. The way you present your dessert tells a story. It reflects the same love and patience that went into baking it. When your guests see the effort in both the taste and presentation, it creates an experience they remember long after the last bite.
Serving desserts beautifully is not about perfection. It is about creating moments that feel special, whether for family, friends, or yourself. Every swirl of cream, every sprinkle of sugar, and every carefully placed slice is a small expression of joy. That is the real beauty of classic desserts.
Healthier Twists on Classic Dessert Recipes
The beauty of classic dessert recipes lies in their adaptability. While traditional versions are indulgent and rich, you can easily give them a healthier twist without sacrificing taste or texture. Over the years, I have learned that baking can be both wholesome and satisfying when you make a few mindful ingredient swaps. With a bit of creativity, your favorite desserts can fit any lifestyle while keeping their comforting charm.
Substituting Ingredients for a Lighter Version
If you love baking but want to reduce sugar or fat, there are many simple ways to do so. One of the easiest swaps is replacing part of the butter or oil with Greek yogurt or unsweetened applesauce. This keeps your desserts moist and soft while cutting down on saturated fat. You can also use natural sweeteners like honey, maple syrup, or coconut sugar instead of refined white sugar. They add a gentle sweetness with extra flavor depth.
When it comes to flour, try replacing half of the all-purpose flour with whole wheat or oat flour. It adds fiber and a subtle nutty flavor that pairs beautifully with recipes like banana bread or apple crumble. For those who enjoy extra texture, adding ground nuts or flaxseed can boost nutrition without altering the taste too much.
Even chocolate can be upgraded. Dark chocolate with at least 70 percent cocoa provides antioxidants and a richer flavor, making your cookies or banana bread even more satisfying.
Vegan and Gluten-Free Adaptations
Many people today are turning to vegan or gluten-free diets, and the good news is that classic dessert recipes can easily be adapted for them too. To make vegan versions, swap butter for coconut oil or plant-based margarine and replace eggs with flax eggs or mashed bananas. These alternatives work surprisingly well in cookies, crumbles, and quick breads.
For gluten-free options, almond flour, oat flour, or a high-quality gluten-free blend can replace regular flour in most recipes. The texture might differ slightly, but the taste remains delicious. Coconut milk or almond milk can substitute for dairy in puddings or cake batters, creating light yet creamy results.
Another great tip is to focus on natural flavor enhancers. Spices like cinnamon, nutmeg, and vanilla can add depth and aroma to your desserts, reducing the need for excess sugar.
Balancing Indulgence and Nutrition
Healthy desserts are not about removing joy from baking. They are about finding balance. Sometimes I bake a classic apple crumble using oats, honey, and olive oil instead of butter, and no one even notices the difference. The goal is to make desserts you feel good about eating and sharing.
If you ever crave something sweet but want to stay mindful, focus on portion control. Serve smaller slices or bake mini versions of your favorite treats. The pleasure remains the same, but the indulgence feels lighter.
When adapting classic dessert recipes into lighter versions, it’s helpful to understand the nutritional content of your ingredients.
The USDA FoodData Central database provides accurate nutrition facts for common baking staples such as sugar, butter, flour, and fruits.
Why Healthier Twists Keep Classic Dessert Recipes Relevant
What makes classic dessert recipes truly timeless is their ability to evolve with our needs. They can be enjoyed by everyone, whether you follow a traditional diet or a modern one. By making thoughtful adjustments, you preserve the nostalgic flavors while embracing a healthier lifestyle.
Classic desserts are more than comfort food. They are a connection between past and present, between indulgence and nourishment. With every healthier twist, you keep the tradition alive while creating something that fits your life today. It is proof that sweetness and wellness can beautifully coexist in every bite.
Storage and Make-Ahead Tips for Home Bakers
Every home baker knows the joy of pulling a fresh dessert from the oven, but keeping it just as delicious in the days that follow is equally important. Proper storage can make your classic dessert recipes last longer while preserving their flavor, texture, and aroma. Whether you are preparing treats ahead of time or saving leftovers, a few smart storage tricks can make all the difference.
How to Keep Desserts Fresh Longer
Different desserts require different storage methods, but the goal is always the same: maintaining freshness.
For baked goods like banana bread or cookies, store them in airtight containers at room temperature. Adding a slice of bread inside the container helps keep them soft, as it maintains the right amount of moisture. If you live in a humid environment, a small sheet of parchment paper between layers prevents sticking.
Apple crumble tastes best when slightly warm, but if you have leftovers, cover the dish tightly with foil or plastic wrap and refrigerate it. It will stay fresh for up to three days. When ready to enjoy again, reheat it in the oven for a few minutes so the topping regains its crispness.
For candied grapes, refrigeration is essential. Keep them in a sealed container to prevent the sugary coating from melting or becoming sticky. They stay fresh for about three days, although they rarely last that long once everyone discovers how addictive they are.
Freezing and Reheating Guidelines
Freezing is one of the best ways to extend the life of your classic dessert recipes without losing their quality. For banana bread, wrap individual slices in plastic wrap and place them in a freezer bag. When you want to enjoy one, thaw it at room temperature or warm it slightly in the microwave. It will taste as fresh as the day it was baked.
Cookies freeze beautifully as well. You can freeze them baked or as dough balls. To bake from frozen, simply place the dough on a baking sheet and add a few extra minutes to the baking time. This way, you can enjoy freshly baked cookies anytime you want.
Crumbles can also be made ahead and frozen before baking. Assemble the dish, cover it tightly, and freeze it. When you are ready to serve, bake it directly from the freezer. It might take a few extra minutes, but the flavor and texture will be just right.
Make-Ahead Tips for Busy Bakers
If you love entertaining or baking in advance, these tips will help you plan efficiently.
- Prepare dry ingredient mixes for your favorite desserts and store them in labeled jars. When it is time to bake, you will only need to add the wet ingredients.
- Cookie dough can be portioned into balls and frozen on a tray before storing in a bag. This allows you to bake a few at a time whenever you need them.
- For quick breads like banana or pumpkin, bake them ahead, cool completely, and wrap tightly. They can be refrigerated for up to five days or frozen for longer.
Having these make-ahead options means you can always have a homemade treat ready for guests or for yourself after a long day.
Why Storage Matters in Classic Dessert Recipes
The effort you put into baking deserves to be preserved. Learning how to store your desserts properly ensures that none of that care goes to waste. Freshness is not just about flavor; it is about maintaining the love and effort that went into making each dessert.
When you handle your classic dessert recipes with the same attention after baking as you did while mixing the batter, you extend their joy. Each slice, crumble, or cookie remains as delicious and comforting as the moment it came out of the oven. Storage is not just practical; it is part of the baking art that keeps sweetness alive day after day.
Conclusion: The Sweet Joy of Tradition in Every Bite
After exploring these beloved classic dessert recipes, one thing becomes beautifully clear: desserts are more than just something sweet to eat. They are memories, emotions, and connections woven into every spoonful and slice. From the comforting aroma of chocolate chip banana bread to the buttery crunch of Magnolia cookies, each recipe reminds us of how food brings people together in the simplest yet most powerful ways.
What makes these classic desserts timeless is their balance of simplicity and love. They do not need complicated ingredients or modern techniques to impress. Instead, they rely on the warmth of the oven, the joy of sharing, and the patience of the baker. Whether it is an apple crumble made for a family dinner or candied grapes prepared for a cheerful gathering, every dessert carries the same message: happiness can be homemade.
In a world where new trends appear every day, these desserts stand as gentle reminders of tradition. They tell us that sometimes, the most meaningful pleasures come from recipes passed down through generations. Each bite connects us to those who came before us, and every bake creates a new memory for those who will come after.
So the next time you crave something sweet, reach for a recipe that has stood the test of time. Bake it slowly, serve it with ley are simple, versatile, and full of heart, reminding us that the sweetest moments often come from the simplest recipes.
ove, and savor every bite. Because in the end, the true beauty of classic dessert recipes lies not only in their flavor but in the joy they bring to everyone who shares them.
Explore More Recipes You’ll Love
Indulge in sweet classics that never go out of style:
- [Chocolate Chip Banana Bread Recipe] – Soft, moist, and loaded with chocolatey goodness.
- [Magnolia Chocolate Chip Cookie Recipe] – Iconic cookies with a chewy center and crisp edge.
- [Simple Apple Crumble] – Warm cinnamon apples with a buttery crumble topping.
- [Candied Grapes Recipe] – A colorful, crunchy-sweet treat perfect for parties or snacking.
Craving more cozy, satisfying dishes? Don’t miss our [Best Comfort Food Recipes] — the ultimate collection of warm, hearty favorites.
FAQs About Classic Dessert Recipes
When it comes to baking, everyone has a few questions about how to perfect their favorite treats or make them last longer. Here are some of the most common questions I receive about classic dessert recipes, along with helpful answers to make your baking easier and more enjoyable.
1. What makes classic dessert recipes different from modern desserts?
Classic dessert recipes focus on simple ingredients and familiar techniques that never go out of style. They are rooted in tradition and rely on comforting flavors such as vanilla, cinnamon, butter, and chocolate. Modern desserts often experiment with new textures and global flavors, but the classics remain timeless because they evoke warmth, nostalgia, and the joy of homemade baking.
2. How can I make my desserts more moist and flavorful?
The secret lies in using fresh, high-quality ingredients and avoiding overmixing your batter. For banana bread or cakes, use ripe bananas or soft fruits for natural sweetness and moisture. Adding a small spoonful of yogurt, sour cream, or oil can also help keep baked goods soft. Always measure ingredients accurately and avoid overbaking, as that can dry them out.
3. Can I reduce the sugar in classic dessert recipes without ruining the taste?
Yes, you can reduce sugar by about 20 to 25 percent in most recipes without affecting the texture too much. You can also use natural alternatives like honey, maple syrup, or coconut sugar for a milder sweetness. Just remember that sugar contributes to both taste and structure, so removing too much can alter the final result.
4. What are some easy desserts for beginners to start with?
If you are new to baking, start with simple recipes such as chocolate chip cookies, banana bread, apple crumble, or candied grapes. These desserts require basic ingredients and simple steps but deliver delicious results. They are forgiving recipes that help you build confidence in the kitchen while giving you that classic homemade flavor everyone loves.
5. How long do homemade desserts stay fresh?
Most classic dessert recipes stay fresh for three to five days when stored properly. Cookies and banana bread can be kept at room temperature in airtight containers, while crumbles and puddings should be refrigerated. Freezing is another great way to preserve freshness for up to three months. Always cool desserts completely before storing them to prevent condensation.
6. Can I make classic desserts vegan or gluten-free?
Absolutely. You can replace butter with plant-based margarine or coconut oil and use flax eggs or mashed bananas instead of regular eggs. For gluten-free versions, try almond flour, oat flour, or a gluten-free blend. These adjustments work beautifully in most recipes without compromising on taste or texture.
7. How do I make my desserts look more professional when serving?
Presentation makes a big difference. Use simple garnishes such as powdered sugar, cocoa, or fruit slices to decorate. Serve on contrasting plates to highlight colors and textures. For extra elegance, drizzle sauces or add a small scoop of ice cream on the side. Even a homemade dessert can look bakery-worthy with a few thoughtful touches.
8. What is the best way to reheat classic desserts without drying them out?
For most baked desserts, the oven is the best reheating method. Warm them at a low temperature for a few minutes to restore moisture. Avoid the microwave when possible, as it can make cakes and cookies rubbery. Covering desserts lightly with foil while reheating helps maintain their softness.